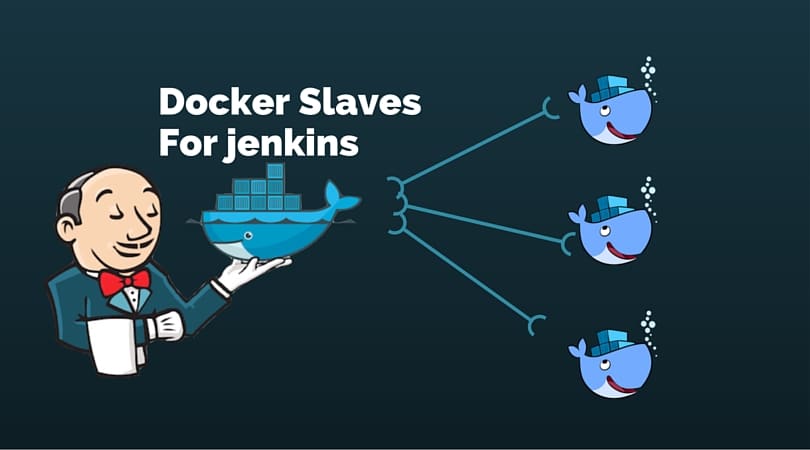
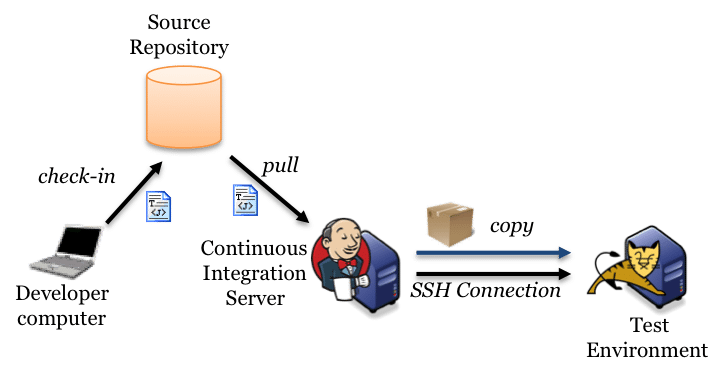
In a distributed Jenkins environment, resource utilization of the slaves will be very less when the builds are not quite often. In this scenario, it is better to use ephemeral docker containers as your build slaves for better resource utilization. As we all know that spinning up a new container takes less than a minute. So, for every build, a new container will get spun up, builds the project and will get destroyed.
The first thing we should do is set up a docker host. Jenkins server will connect to this host for spinning up the slave containers. I am going to use Ubuntu 14.04 server as my docker host.
2. Jenkins master connects to the docker host using REST API’s. So we need to enable the remote API for our docker host. Follow enabling docker remote API tutorial.
Once you enabled and tested the API, you can now start configuring the Jenkins server.
Create A Jenkins Slave Docker Image
Next step is to create a slave image. The image should contain the following minimum configurations to act as a slave.
1. sshd service running on port 22.
2. Jenkins user with password.
3. All the required application dependencies for the build. For example, for a java maven project, you need to have git, java, and maven installed on the image.
Make sure sshd service is running and can be logged into the containers using a username and password. Otherwise, Jenkins will not be able to start the build process.
Configure Jenkins Server
1. Head over to Jenkins Dashboard –> Manage jenkins –> Manage Plugins.
2. Under available tab, search for “Docker Plugin” and install it.
3. Once installed, head over to jenkins Dashboard –> Manage jenkins –>Configure system.
4. Under “Configure System”, if you scroll down, there will be a section named “cloud” at the last. There you can fill out the docker host parameters for spinning up the slaves.
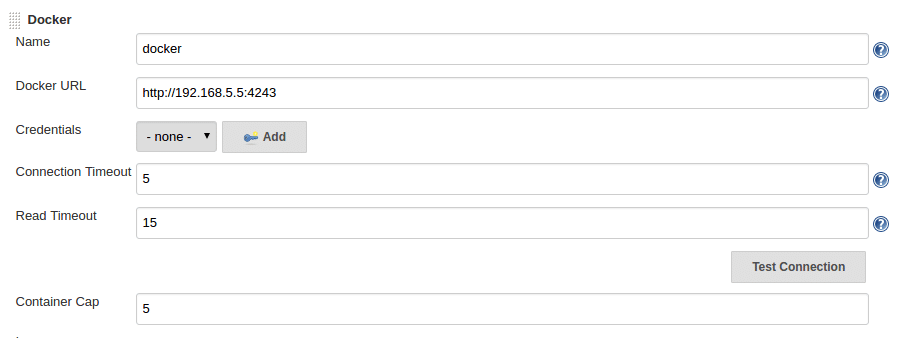
5. Under docker, you need to fill out the details as shown in the image below.
Note: Replace “Docker URL” with your docker host IP. You can use the “Test connection” to test if jenkins is able to connect to the docker host.
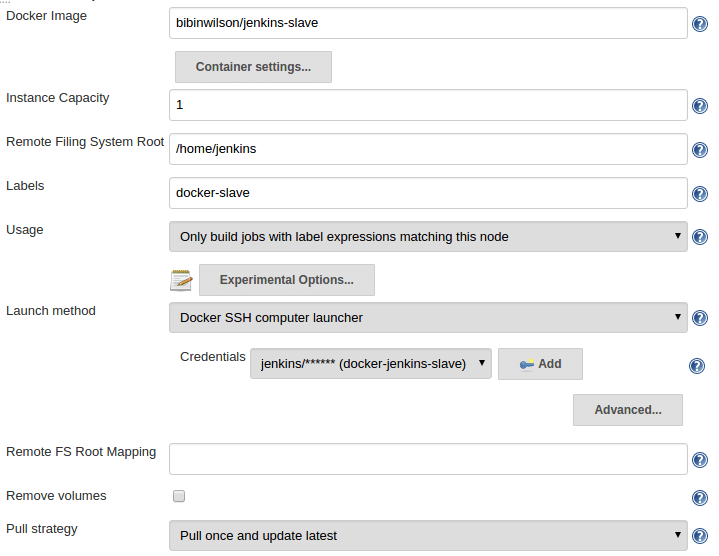
5. Now, from “Add Docker Template” dropdown, click “docker template” and fill in the details based on the explanation and the image given below.
Docker Image – Image that you created for the slave.
Remote Filing System Root – Home folder for the user you have created. In our case it’s jenkins.
Labels – Identification for the docker host. It will be used in the Job configuration.
Credentials – click add and enter the username and password that you have created for the docker image. Leave the rest of the configuration as shown in the image below and click save.
Building Jobs On Docker Slaves
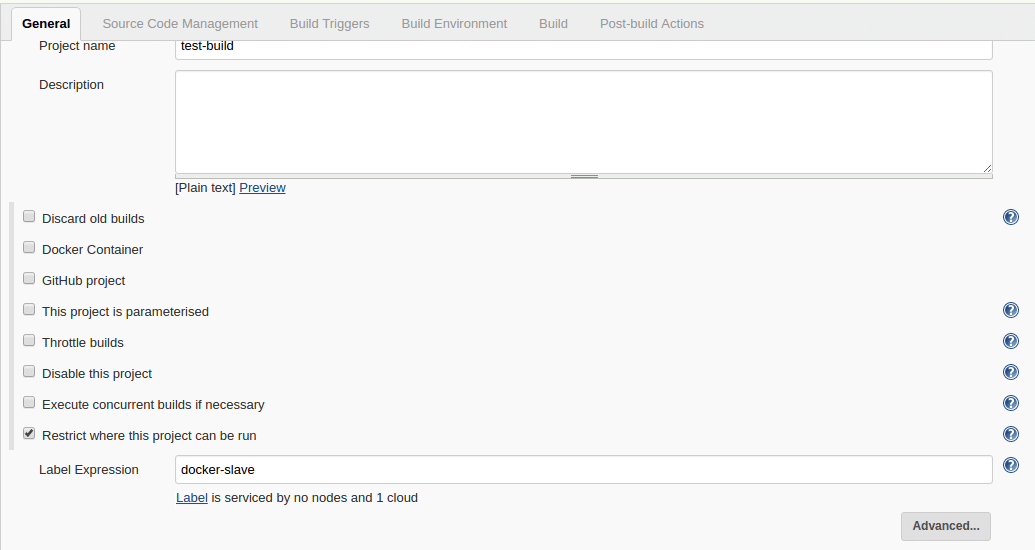
Now that you have the slave configurations ready, you can create a job, select “Restrict where this project can be run” option and select the docker host as slave using the label as shown below.
If you have done all the configurations right, Jenkins will spin up a container, builds the project and destroys the container once the build is done. You can check the build logs in your jobs console output.
Java Continuos Integration With Jenkins – Beginners Guide0
In this article, I will guide you to set up a simple CI work-flow for a Java spring based applications. This is just a getting started guide.
For the demo, I will be using a minimal spring pet clinic web app from Github. It has a minimal in-memory DB, so you don’t have to do a complex setup. You can just build and deploy the app.
You can have a look at the pet clinic web app source code from here
Java Continuos Integration With Jenkins
To set up Continuos Integration work flow for a Java application, you need the following.
1. A version control system – we will use Git and Github.
2. A Continous Integration tool – We will use Jenkins
3. A build tool – We will use maven.
Setting Up A Github Repository
First, you need to set up a Github Repository for your project. So that you can push your local code to remote Github repository. If you are not familiar with Github, you can create one account from here. Github Account
Covering Github concepts here is out of the scope of this article. If you are new to Github, you can make use of this tutorial. Github Tutorial
As I mentioned earlier, I will be using a spring pet clinic web app for this demo. So I have created a Github repo for the same. You can get that code from here. Spring Demo App
Setting Up Jenkins
I am setting up a Jenkins server using the official Jenkins docker image.If you don’t have any idea about docker, I highly recommend you to try it out.
It is not mandatory to setup Jenkins using docker, you can also manually configure it on a server.
To run a docker Jenkins container, you just have to execute the following command on a docker host. Just replace /home/ec2-user/jenkins_home with a folder from your host machine. By doing this, all the Jenkins jobs and configuration will persist in you host even if you delete the container.
You can access the Jenkins UI on port :8080 from the browser.
Now, we have a Jenkins server up and running.
Configuring Maven
Since we are using maven as a build tool, we need to configure maven on Jenkins. To do this, go to manage jenkins–>configure system.
Under configure system, you will see an option for maven. click add maven option, give it a name(arbitrary) and save it.
Install Git Plugin
To integrate Jenkins with Github or any Git-based version control system, you need git plugin to be installed on jenkins server.
To do this, go to manage jenkins–>manage plugins–> available tab.
Search for git in the filter search box at the top.
Select Github Authentication Plugin and click “Install without restart” option.
Click restart jenkins option at the bottom when it is installing the plugin.
Integrating Github Petclinic Repo With Jenkins
Now we have all the required plugins and tools for the GitHub Integration. Next step is to create a job where you will have the option to integrate the Petclinic repo with Jenkins.
Follow the steps given below.
1. From the Jenkins home page, click “create a job” option.
2. Give your job a name, eg: petclinic-job and select maven project option.
3. click ok.
4. In the next page, Under “source code management” option, select git and enter your GitHub repository URL. eg: https://github.com/bibinwilson/java-app as shown below.
==============================
How To Install And Configure Jenkins 2.0 – Getting Started
Jenkins 2.0 has lots of great functionalities that will make the CI pipeline really smooth. One of such example is the DSL based build pipeline. In this guide, i will walk you through the steps for installing and configuring a Jenkins 2 server on a ubuntu 14.04 box.
Install And Configure Jenkins 2.0
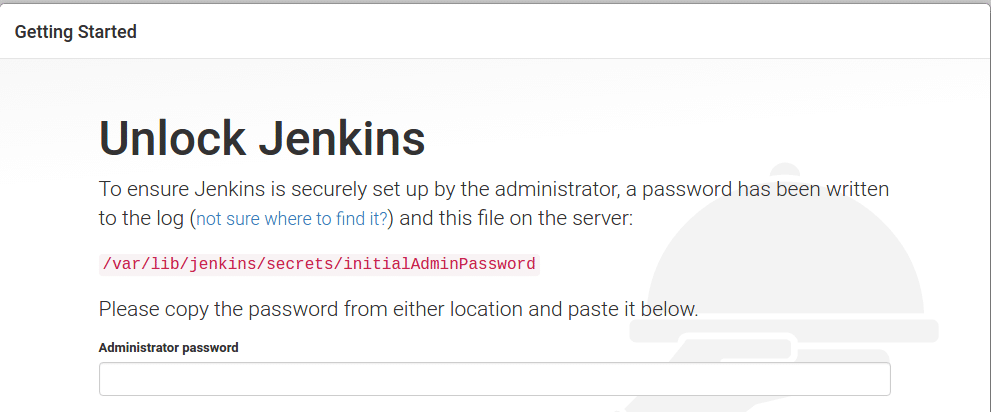
Follow the steps given below to install and configure Jenkins 2 on a ubuntu server.
Note: We are doing this installation on a Vagrant Ubuntu 14.04 box.
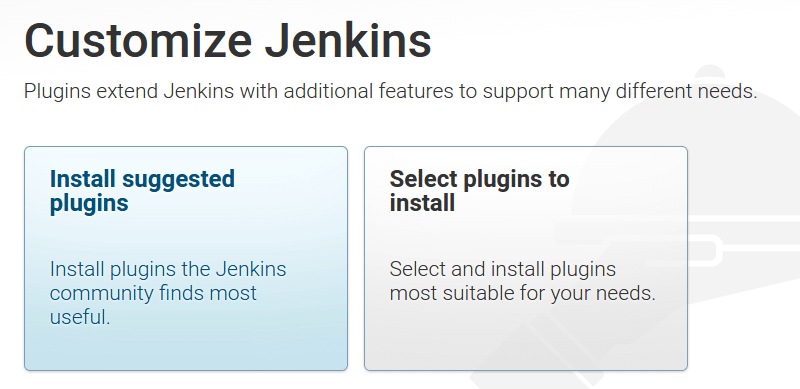
7. Next, you will be asked to configure plugins as shown below. Select “Install Suggested Plugins” option. This will install all the required plugins for building your projects. It will take few minutes to install the plugins.
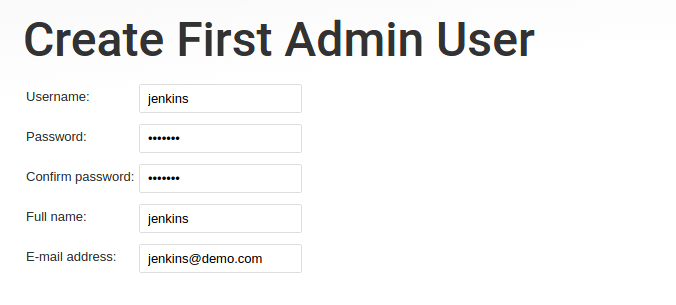
8. Once installed, You need to create a user with password and click “save and finish”
9. Click “Start Using Jenkins” and it will take you to the Jenkins Dashboard. Log in using the username and password that you have given in step 8.
10. If you want to build java maven project, you need to install maven using the following command.
sudo apt-get install -y maven2
That’s it! Now you have a fully functional Jenkins 2.0 server up and running. Next, would be the configuration of distributed setup wherein you will have a active master and slaves for building the projects.
If you are a docker user, you can Configure Jenkins 2.0 using the following commands.
docker run -p 8080:8080 -p 50000:50000 --name jenkins jenkinsci/jenkins:2.0-rc-1.
One of the best features of Jenkins is its distributed nature. You can configure multiple build slaves to for better segregation and scalability. For example, you might want to test a cross-platform code base with different operating system. In this case, you can configure different OS slaves and run the job against it. Also, a distributed architecture will reduce the load on the master server.
Setup Slaves On Jenkins 2.0
In this guide, I will walk you through the steps for setting up the slaves.
There are two ways for setting up the slaves.
1. Using username and password
2. Using ssh keys.
Slave Prerequisites
You need to do the following in the slave machines before adding it to the master.
Note: I am using Ubuntu machine as a slave.
1. Create a jenkins user and a password using the following command.
sudo adduser jenkins --shell /bin/bash
Type a password when prompted. The above commands should create a user and a home directory named jenkins under “/home”.
2. Now, login as jenkins user.
su jenkins
3. Create a “jenkins_slave” directory under /home/jenkins.
mkdir /home/jenkins/jenkins_slave
Setting Up Slaves Using Username And Password
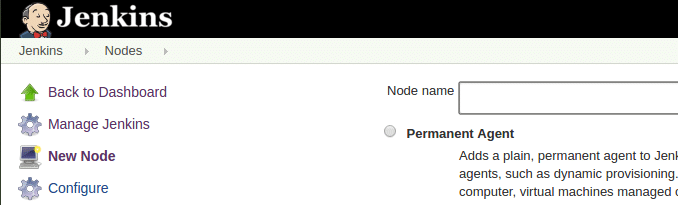
1. Head over to Jenkins dashboard –> Manage Jenkins –> Manage Nodes
2. Select new node option.
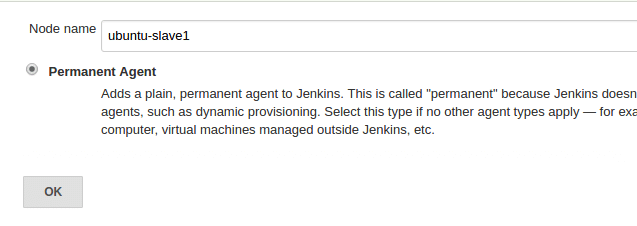
3. Give it a name, select the “permanent agent” option and click ok.
4. Enter the details as shown in the image below and save it. For credential box, click the add button and enter the slaves jenkins username and password (For logging into the slave machine) that you created during the slave configuration. To know what each option means, click the question mark at the right side of each text box.
4. Once you click save, Jenkins will automatically connect to the slave machine and will configure an agent.
Like this, you can add multiple nodes as slaves.
Setting Up Slaves Using Ssh Keys
1. Login to the slave server as a jenkins user.
2. Create a .ssh directory and cd into the directory.
mkdir ~/.ssh && cd ~/.ssh
3. Create an ssh key pair using the following command. Press enter for all the defaults when prompted.
ssh-keygen -t rsa -C "The access key for Jenkins slaves"
4. Add the public to authorized_keys file using the following command.
cat id_rsa.pub > ~/.ssh/authorized_keys
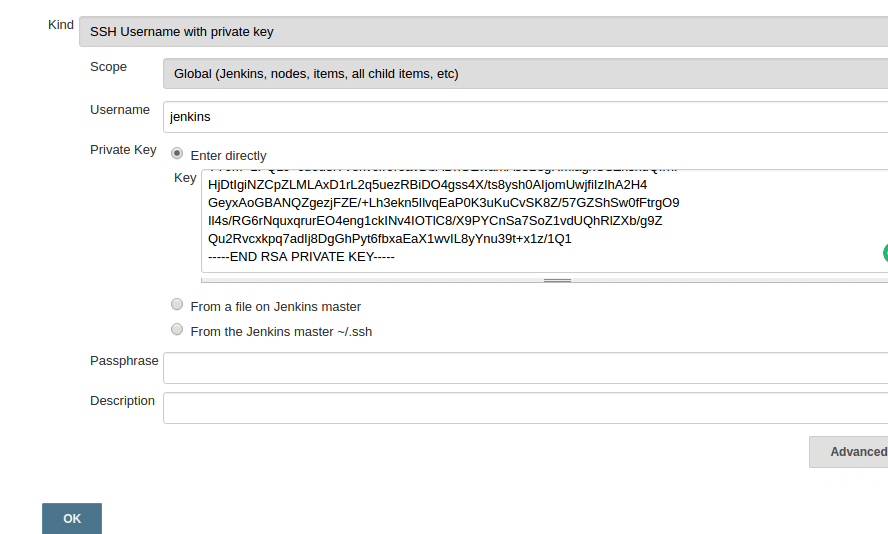
5. Now, copy the contents of the private key to the clipboard.
cat id_rsa
Add The Private Key To Jenkins Credential List
1. Go to jenkins dashboard –> credentials –> Global credentials –> add credentials , select and enter all the credentials as shown below and click ok.
Setup Slaves From Jenkins Master
1. For this, follow the first 3 steps we did for slave configuration using username and password.
2. Follow all the configuration in the 4th steps. But this time, for launch method, select the credential you created with the ssh key.
Test The Slaves
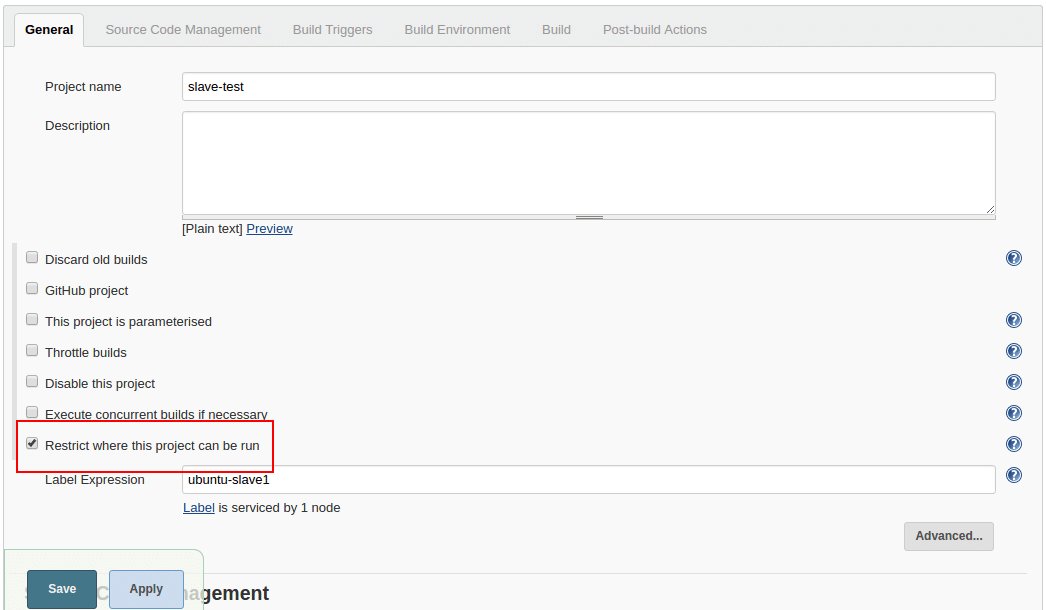
To test the slave, create a sample project and select the option as shown below. You need to select the node using the label option. If you start to type the letter the node list will show up.
Conclusion
In this tutorial, we learnt how to setup slaves on Jenkins 2. Ther is no complex step involved in this configuration. When it comes to automating the process, you will need scripts and jenkins CLI to this. I will cover that in future posts.
In a distributed Jenkins environment, resource utilization of the slaves will be very less when the builds are not quite often. In this scenario, it is better to use ephemeral docker containers as your build slaves for better resource utilization. As we all know that spinning up a new container takes less than a minute. So, for every build, a new container will get spun up, builds the project and will get destroyed.
The first thing we should do is set up a docker host. Jenkins server will connect to this host for spinning up the slave containers. I am going to use Ubuntu 14.04 server as my docker host.
2. Jenkins master connects to the docker host using REST API’s. So we need to enable the remote API for our docker host. Follow enabling docker remote API tutorial.
Once you enabled and tested the API, you can now start configuring the Jenkins server.
Create A Jenkins Slave Docker Image
Next step is to create a slave image. The image should contain the following minimum configurations to act as a slave.
1. sshd service running on port 22.
2. Jenkins user with password.
3. All the required application dependencies for the build. For example, for a java maven project, you need to have git, java, and maven installed on the image.
Make sure sshd service is running and can be logged into the containers using a username and password. Otherwise, Jenkins will not be able to start the build process.
Configure Jenkins Server
1. Head over to Jenkins Dashboard –> Manage jenkins –> Manage Plugins.
2. Under available tab, search for “Docker Plugin” and install it.
3. Once installed, head over to jenkins Dashboard –> Manage jenkins –>Configure system.
4. Under “Configure System”, if you scroll down, there will be a section named “cloud” at the last. There you can fill out the docker host parameters for spinning up the slaves.
5. Under docker, you need to fill out the details as shown in the image below.
Note: Replace “Docker URL” with your docker host IP. You can use the “Test connection” to test if jenkins is able to connect to the docker host.
5. Now, from “Add Docker Template” dropdown, click “docker template” and fill in the details based on the explanation and the image given below.
Docker Image – Image that you created for the slave.
Remote Filing System Root – Home folder for the user you have created. In our case it’s jenkins.
Labels – Identification for the docker host. It will be used in the Job configuration.
Credentials – click add and enter the username and password that you have created for the docker image. Leave the rest of the configuration as shown in the image below and click save.
Building Jobs On Docker Slaves
Now that you have the slave configurations ready, you can create a job, select “Restrict where this project can be run” option and select the docker host as slave using the label as shown below.
If you have done all the configurations right, Jenkins will spin up a container, builds the project and destroys the container once the build is done. You can check the build logs in your jobs console output.
In our last post, we wrote about setting up docker containers as build slaves. Integrating docker into your build pipeline has lots of advantages. Especially when it comes to ECS cluster based build slave setup, the advantages are even more. Few of them are,
1. In teams where continuous development happens, most the time the slave machines will be idle. By using ECS you can save cost by reducing the jenkins slave machines. The cluster capacity increases when there is a need for more resources.
2. Manage build environments in containers with tagged versions as compared to installing several versions of an application on the same machine.
3. Optimal usage of system resources by spinning up containers only when needed.
To integrate ECS with the jekins master, jenkins should have AWS SDK access. You can enable this in two ways.
1. You can add an IAM role with EC2 Container service Full Access to the instance where you have installed the jenkins server.
2. You can add AWS access key and secret key to the Jenkins credentials and use it with the ECS configuration. If you are running jenkins in a container outside ECS, this will be the only available option. If you are running your jenkins server in ECS, then you can assign it a task role having privileges to ECS cluster.
In this tutorial, I am using the access key and secret key stored in Jenkins AWS credentials.
Follow the steps given below for configuring the ECS plugin to integrate the ECS cluster.
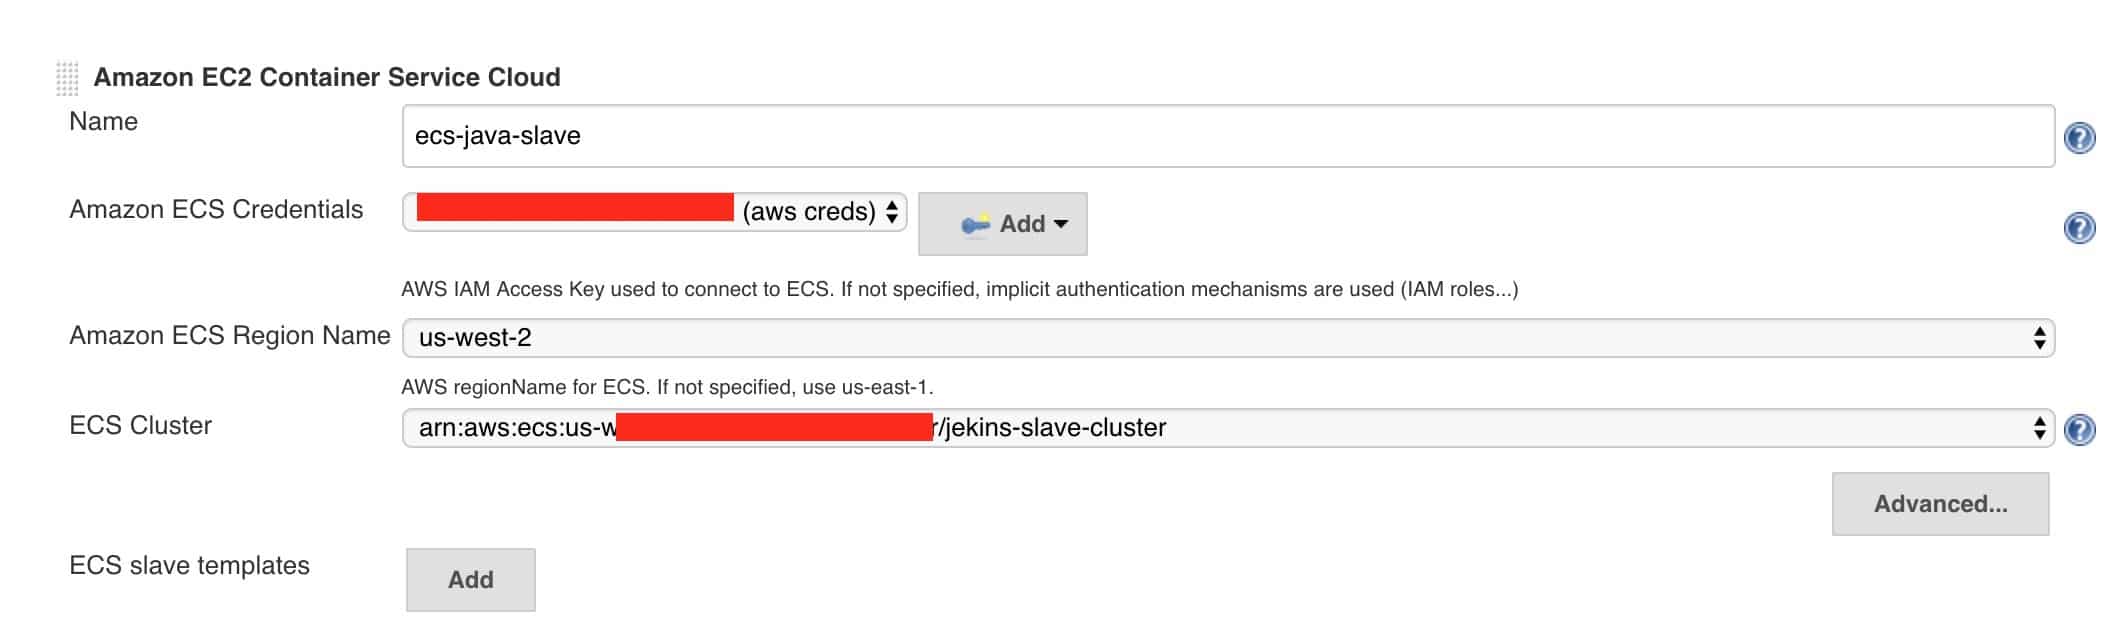
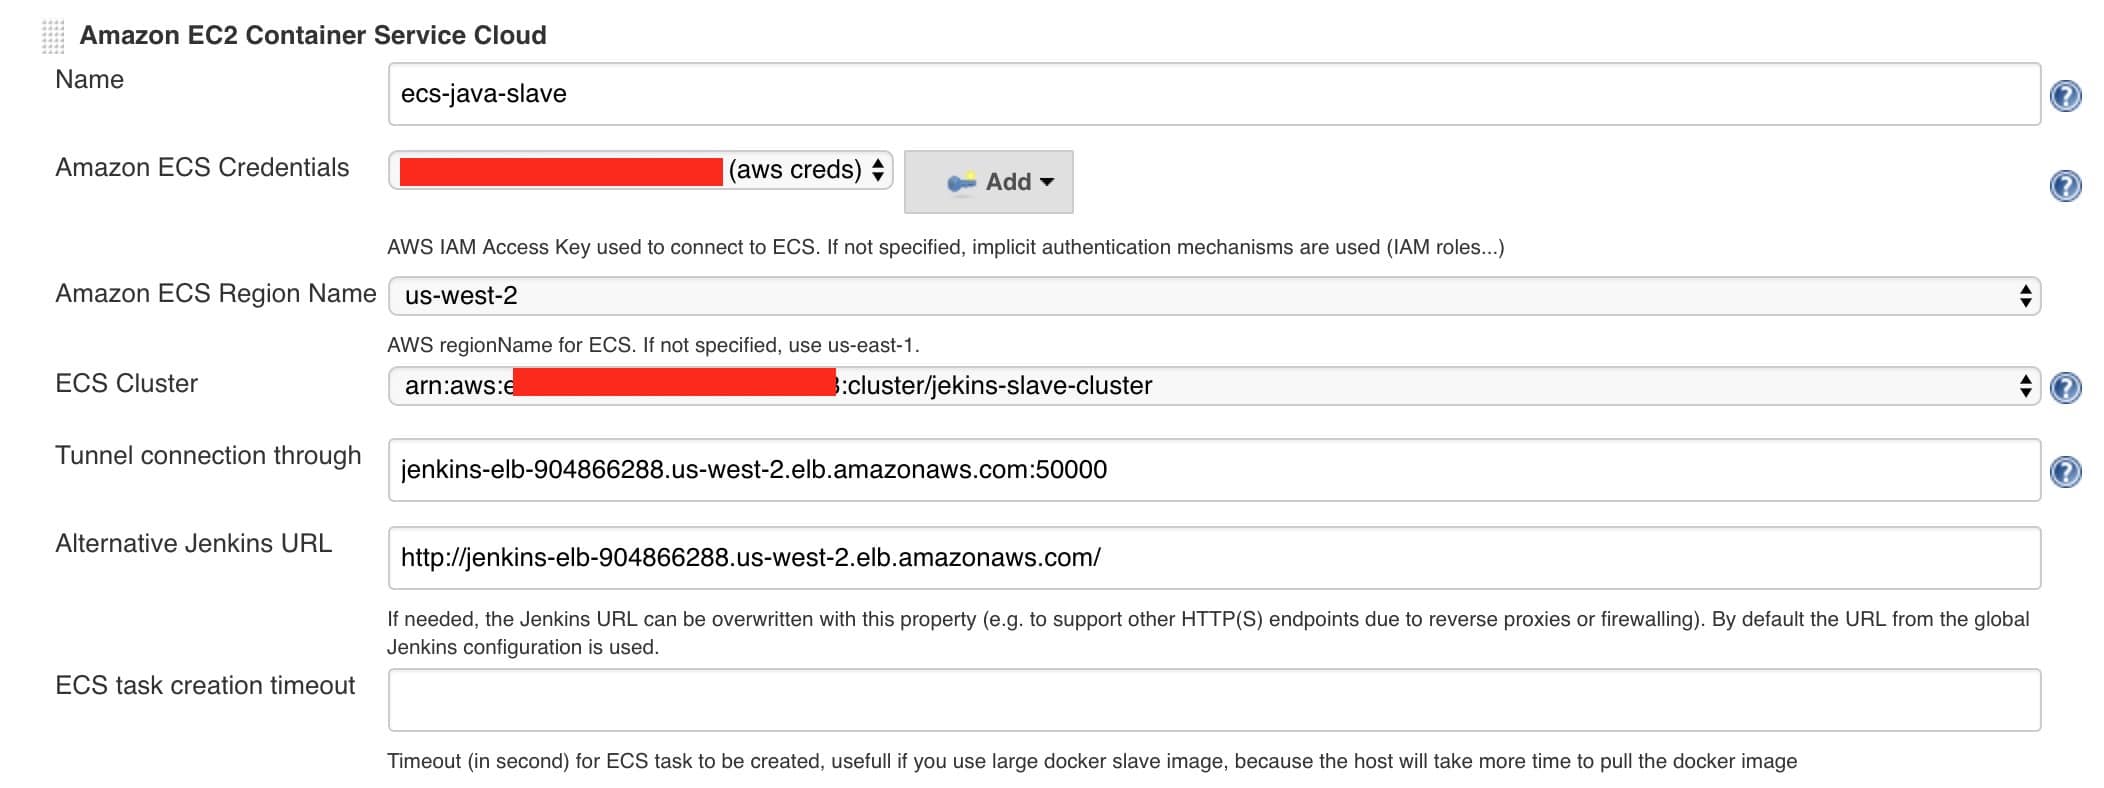
1. Go to Manage Jenkins –> Configure System and search for cloud option.
2. Click Add a new cloud dropdown and select Amazon EC2 Container Service Cloud
3. You need to fill up the following details.
Name: User defined name.
Amazon ECS Credentials: If you are using AWS access keys, select the relevant credential. If you using AWS role, leave it empty. The cluster will get listed automatically.
Amazon ECS Region Name: AWS region where you have the cluster.
ECS Cluster: Select your ECS cluster from the drop-down.
An example is shown below.
If you are running jenkins master under an ELB, you need to add the tunnel configuration in the advanced section.
The Tunnel connection through option should have the elb URL followed by the JNLP port as shown below.
4. Next, you need to add a slave template with a docker image which acts as a slave node.
To do this, under ECS slave templates in the cloud configuration, click add and enter the details. In the following example, I have added a java JNLP slave image with label java-ecs-salve. Label is very important, because, we will use the label name in the job to restrict the job to run on containers.
After filling out the details, save the configuration.
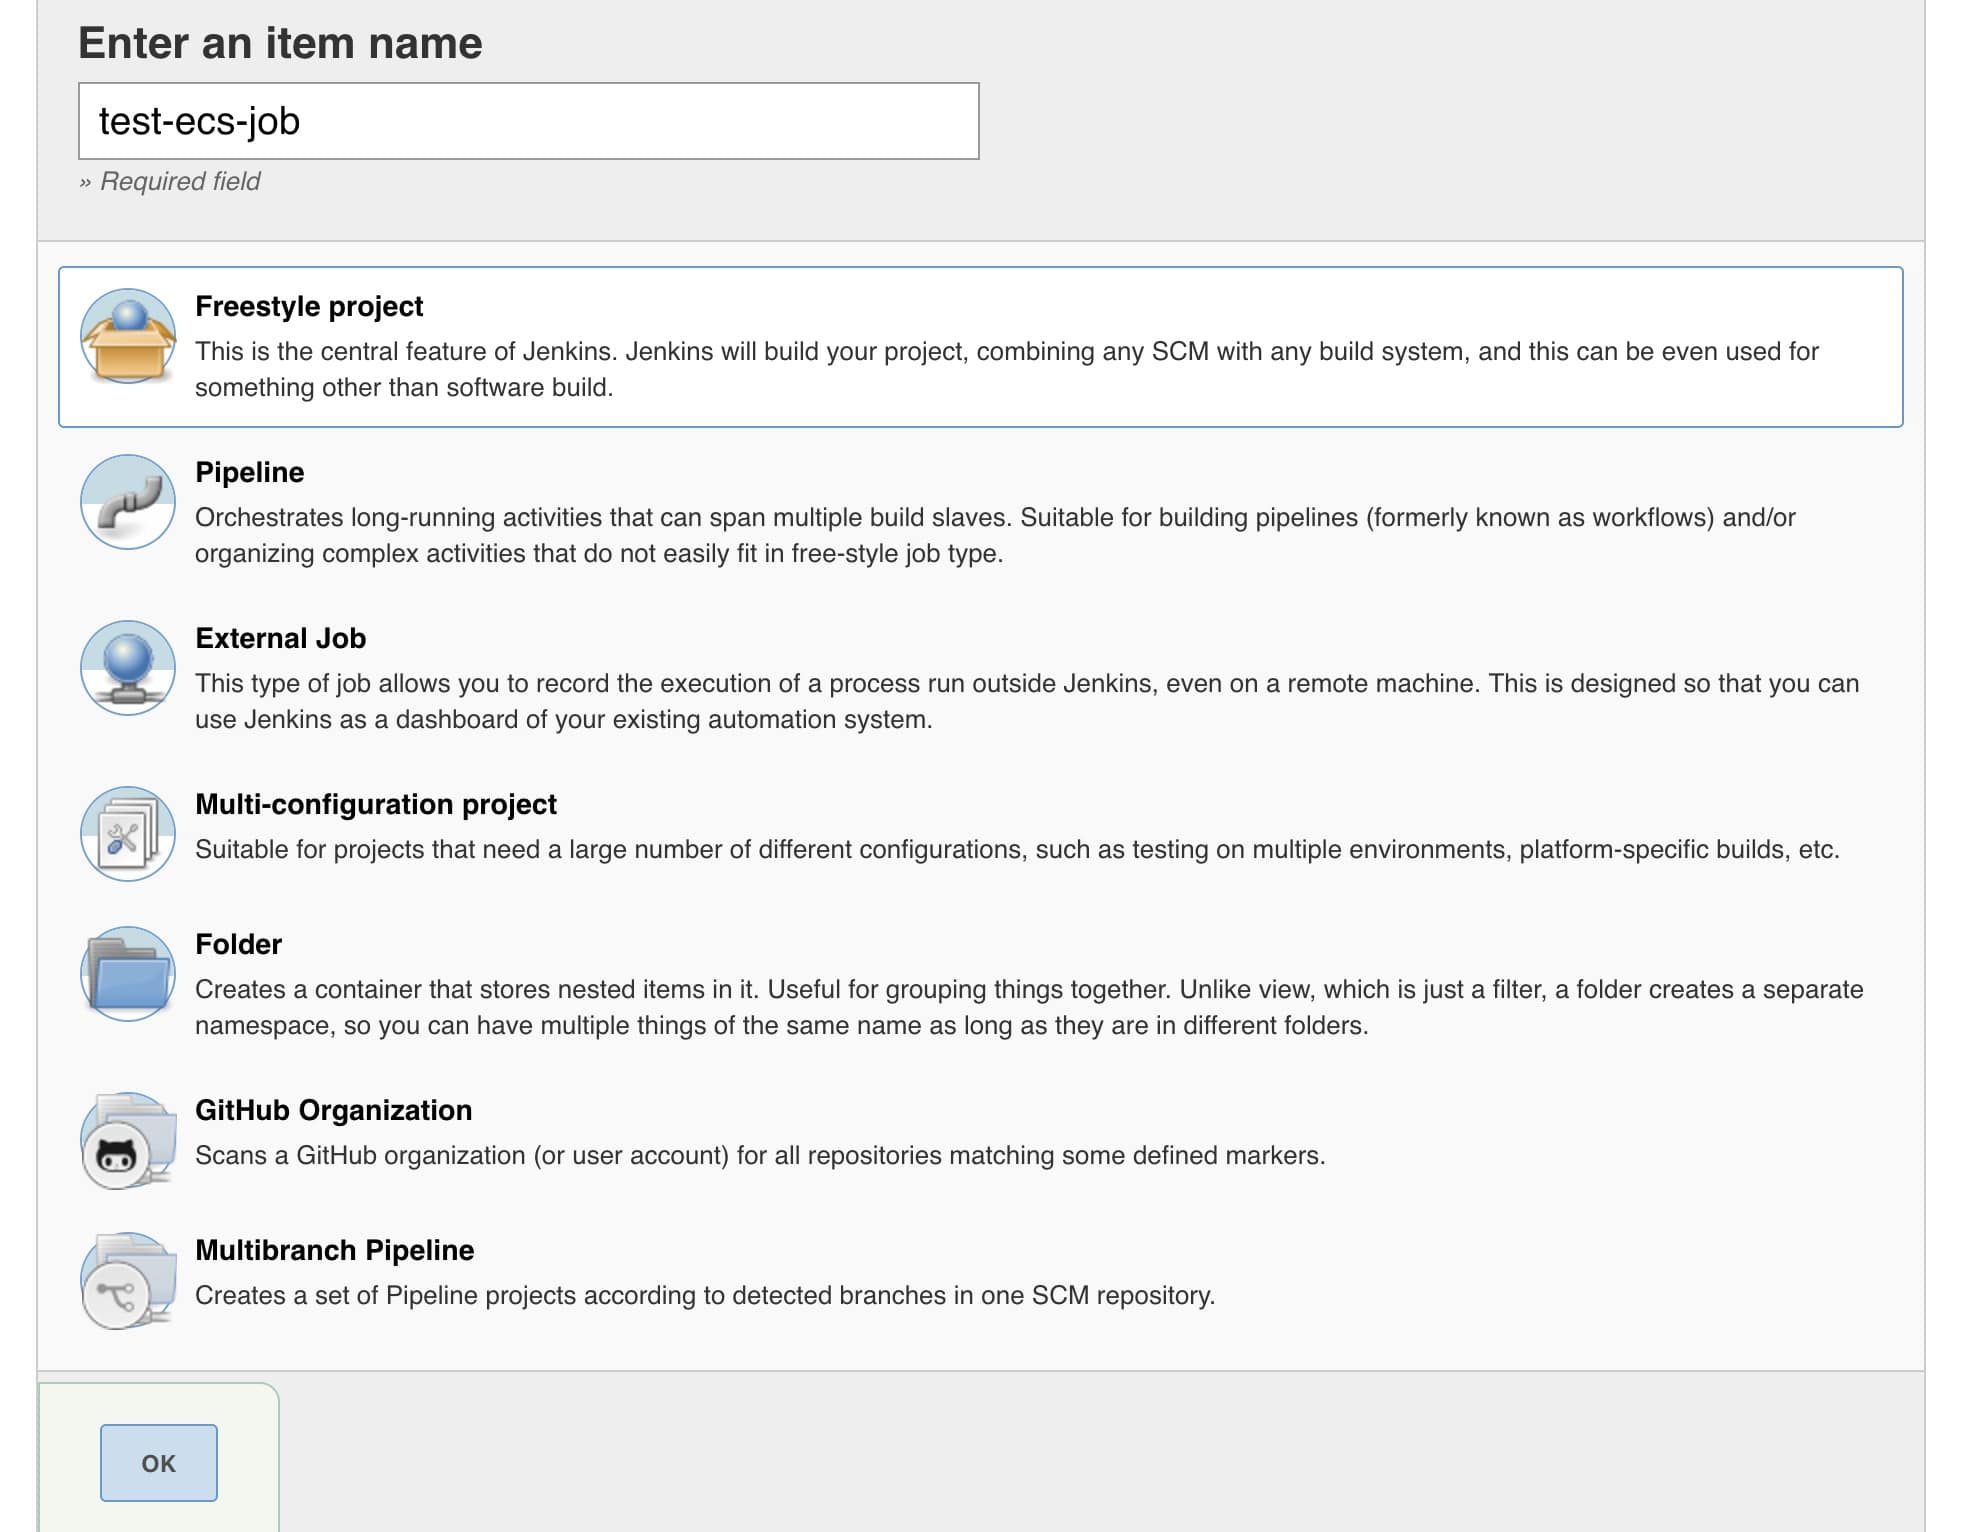
Test The Configuration
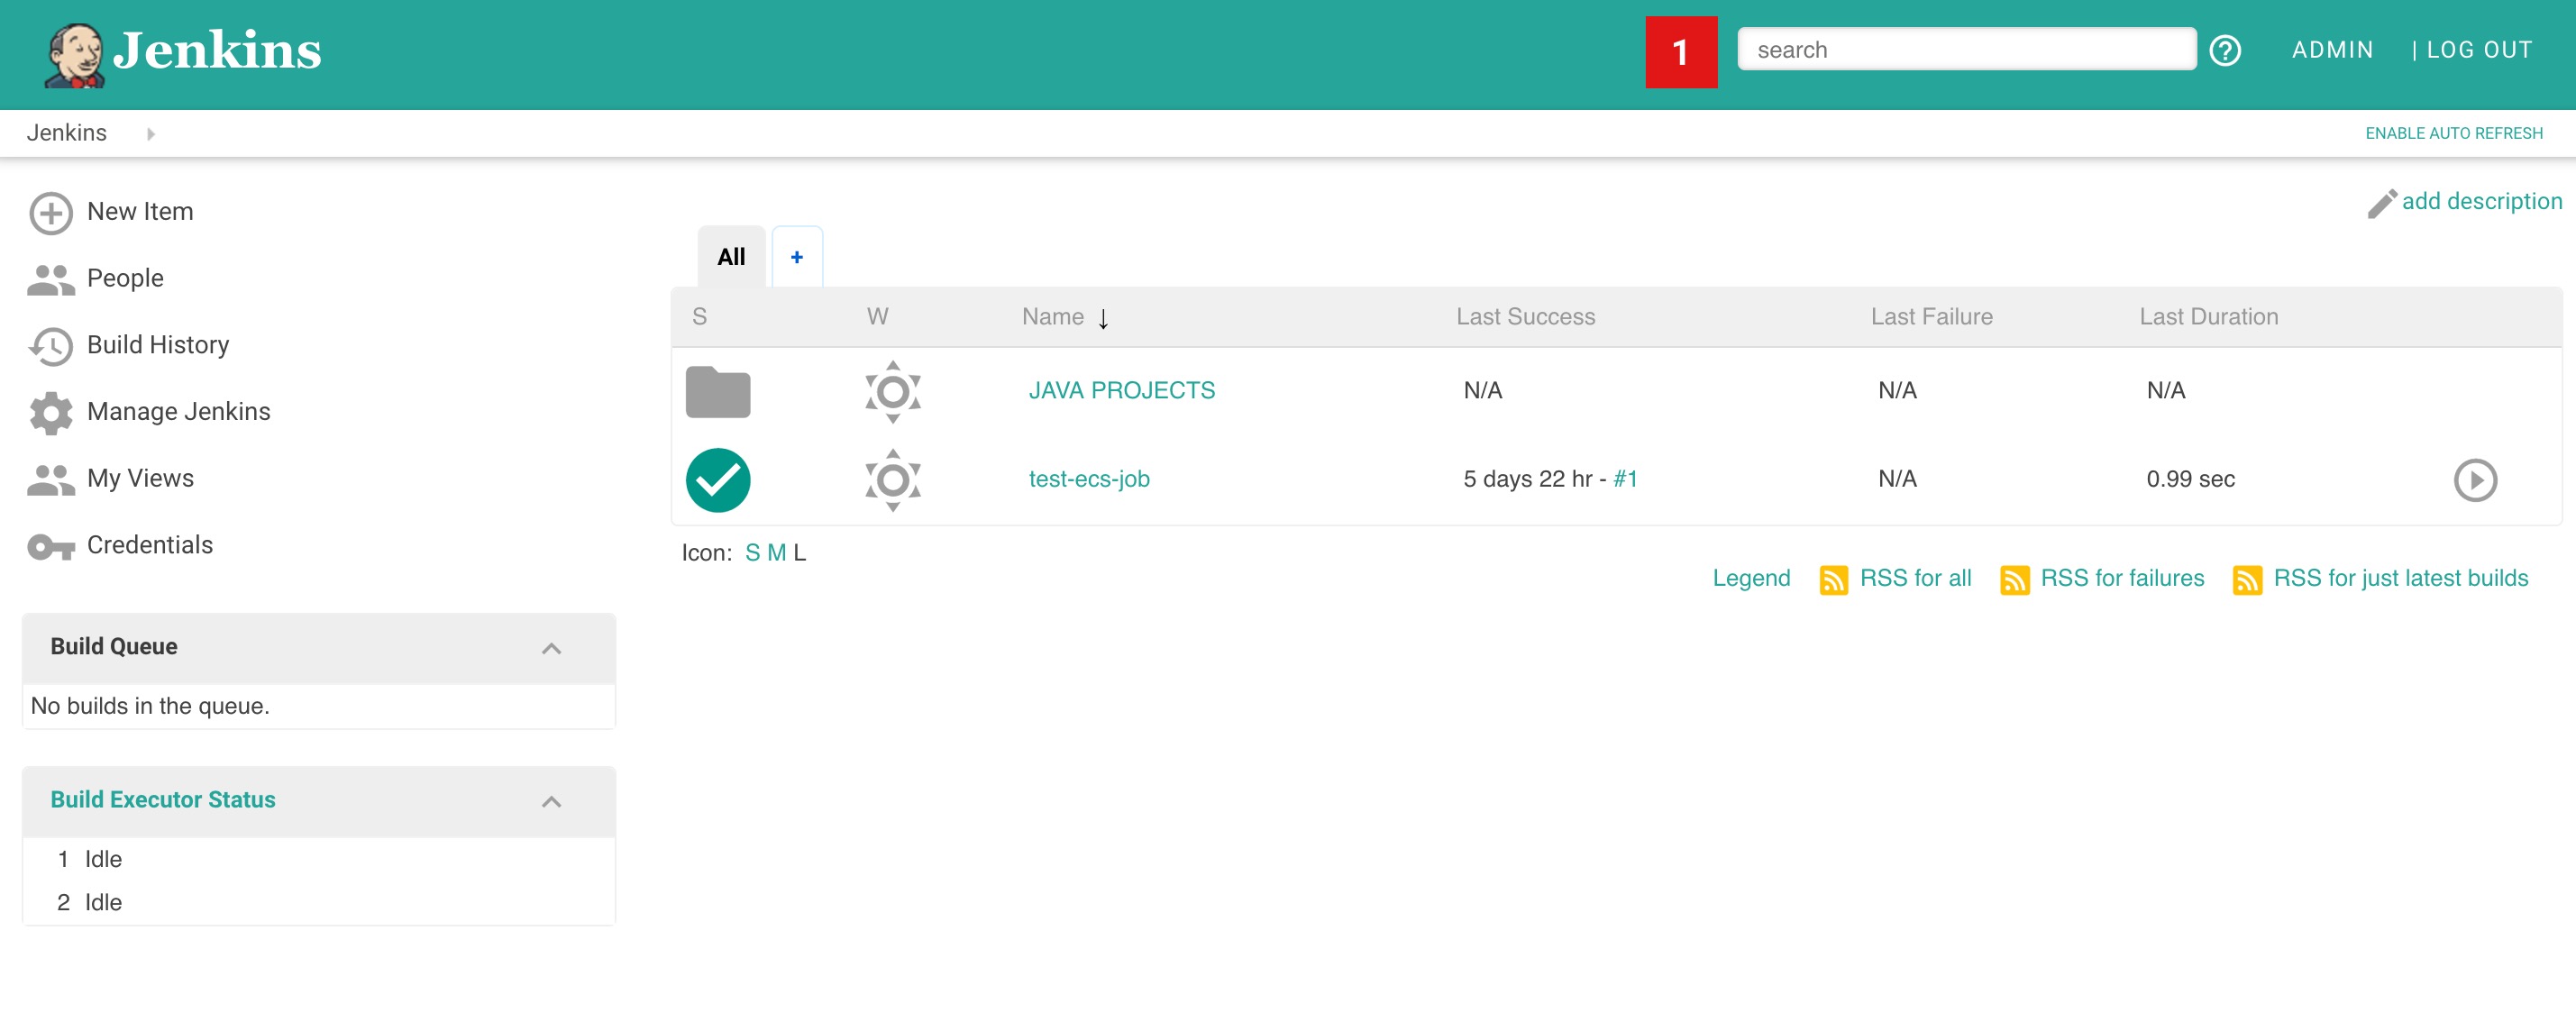
To test the configuration, we will create a Freestyle project and try to run it on ECS.
1. Go to New item and create a freestyle project.
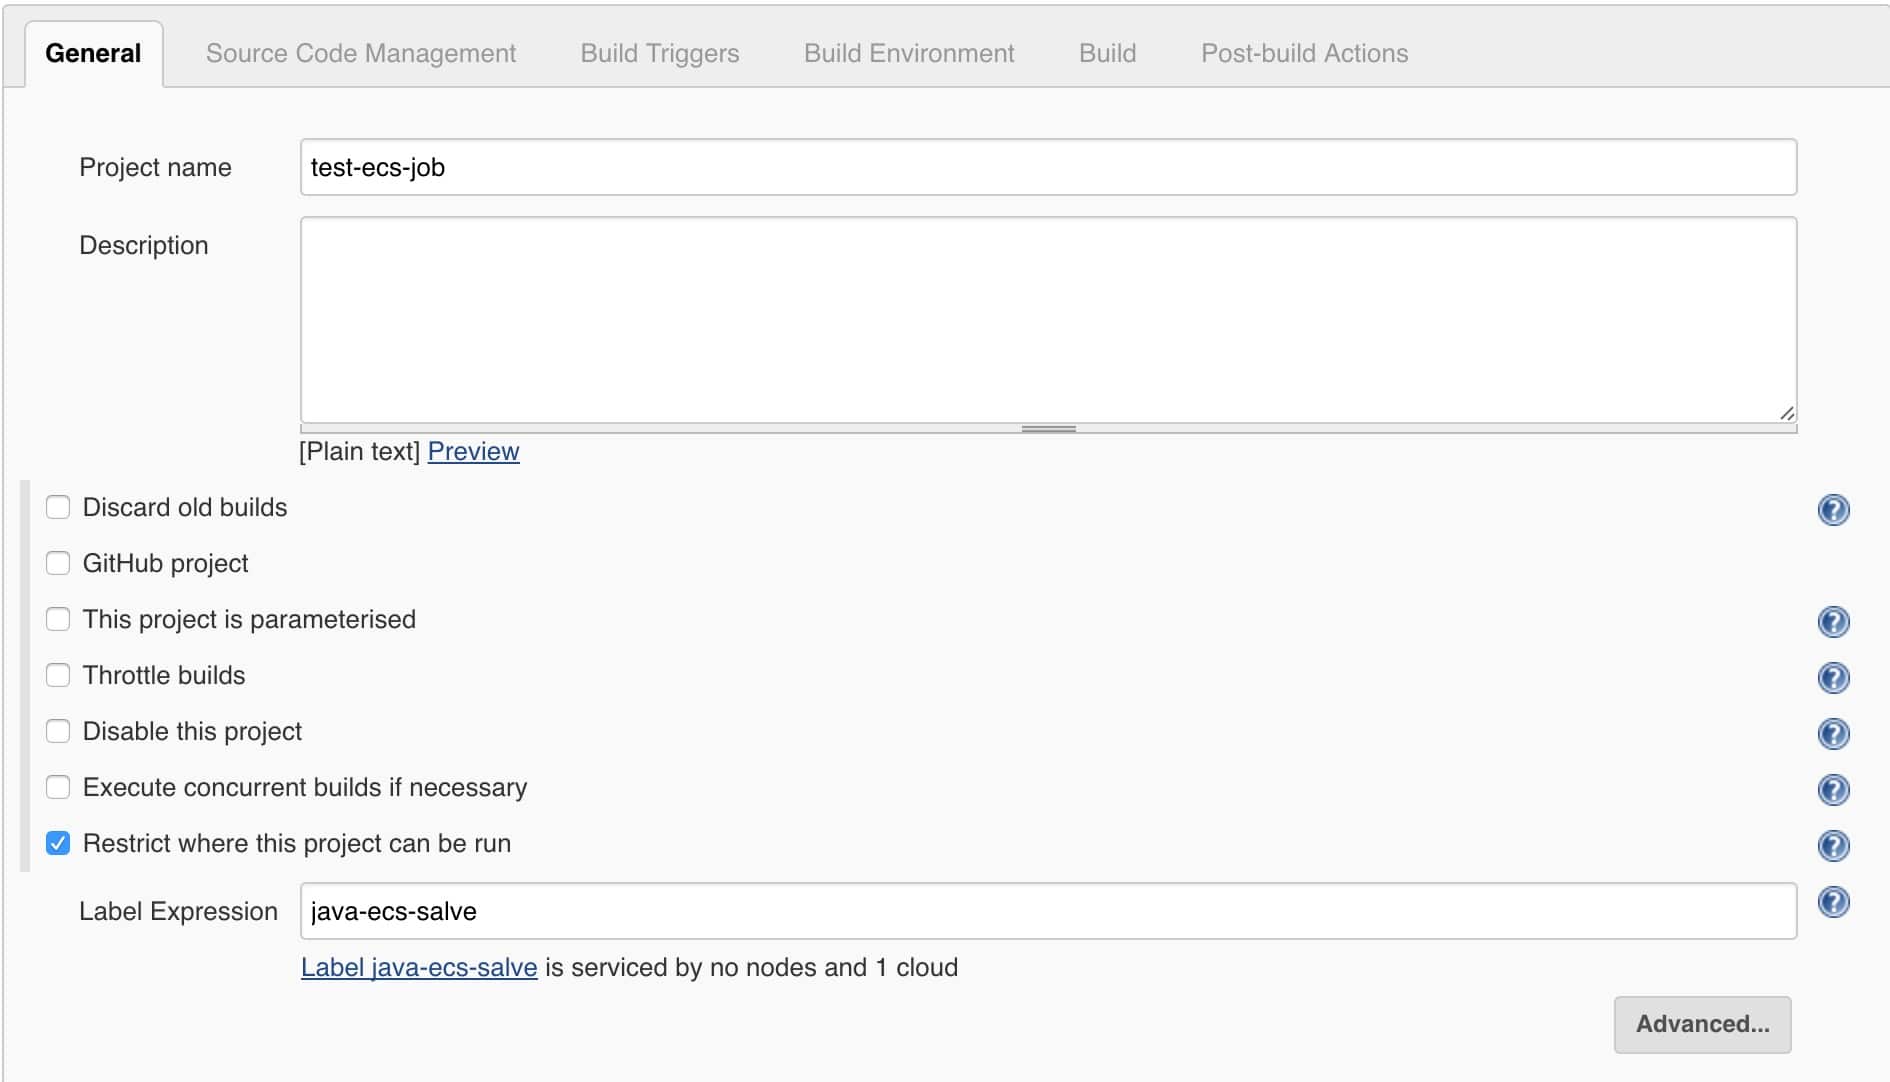
2. Under Restrict where this project can be run type the label name you have given in the slave template as shown in the image below.
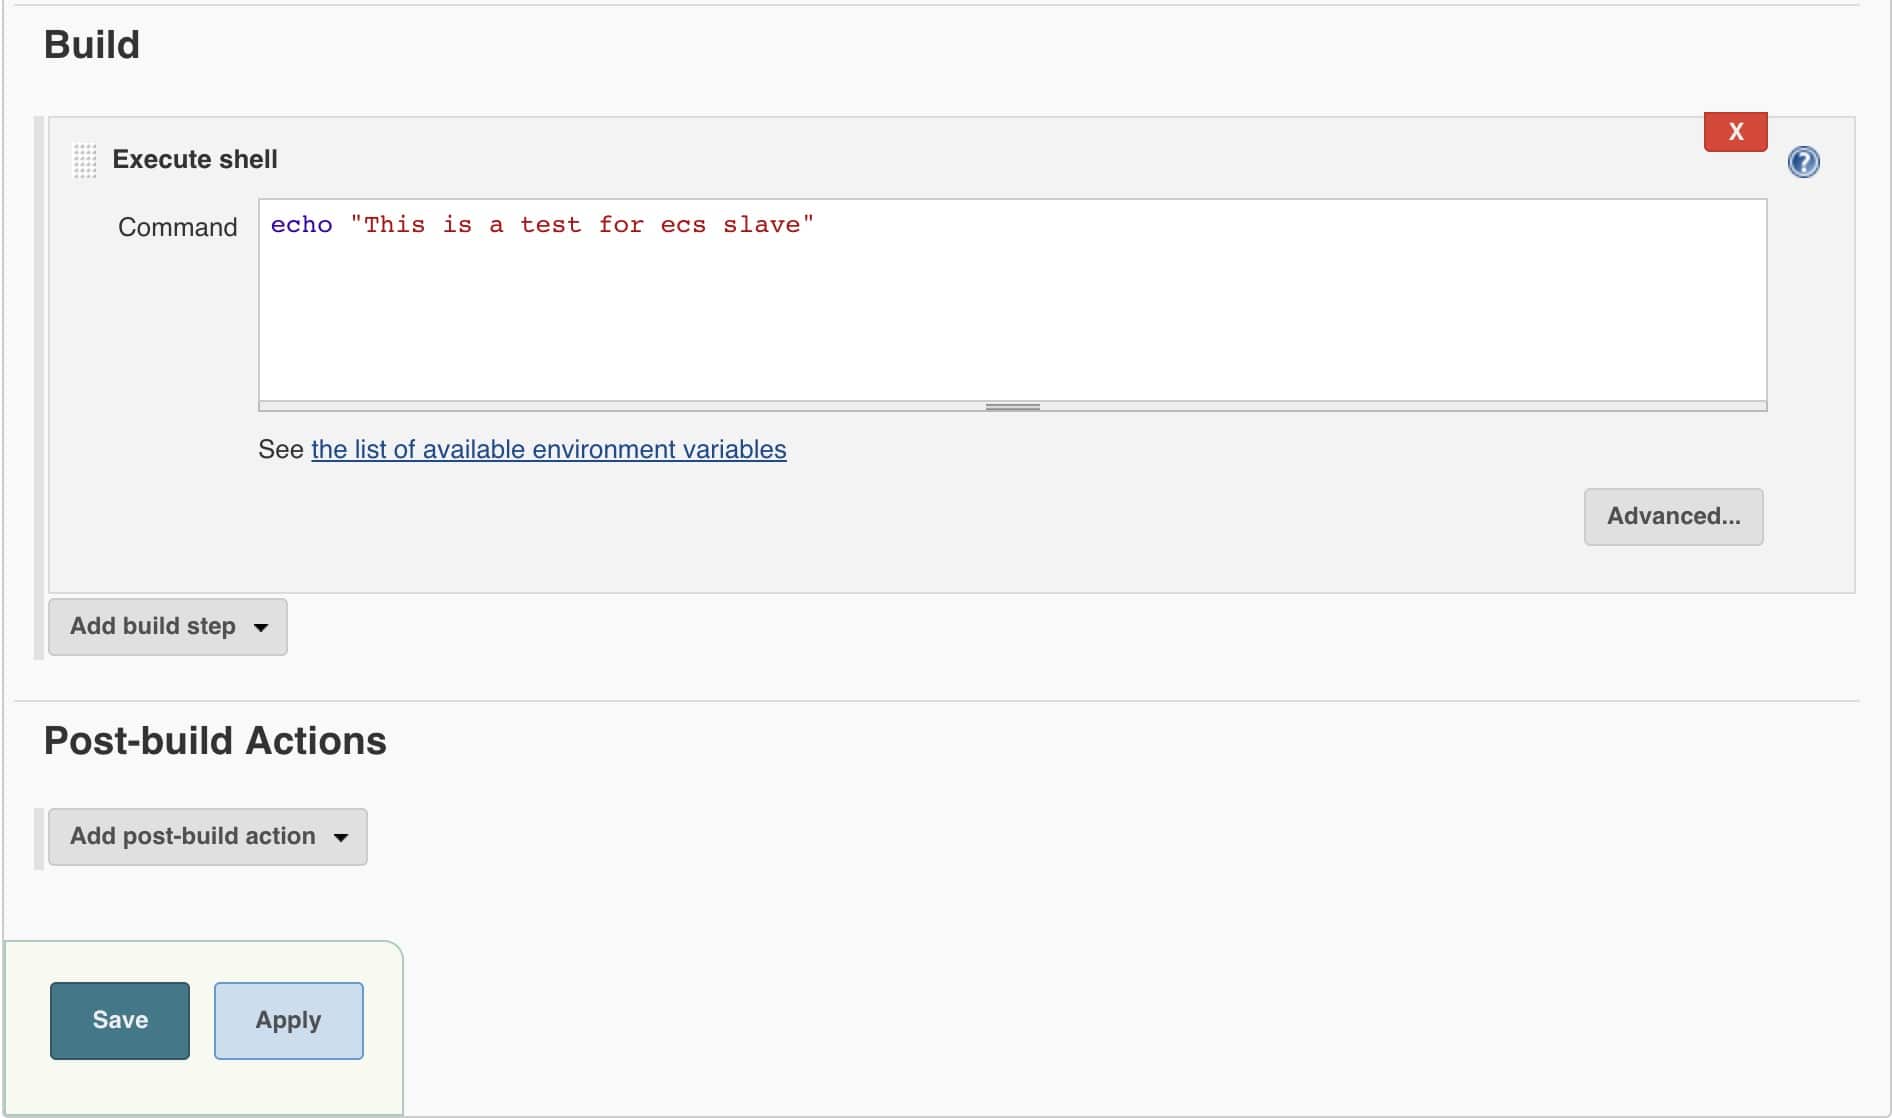
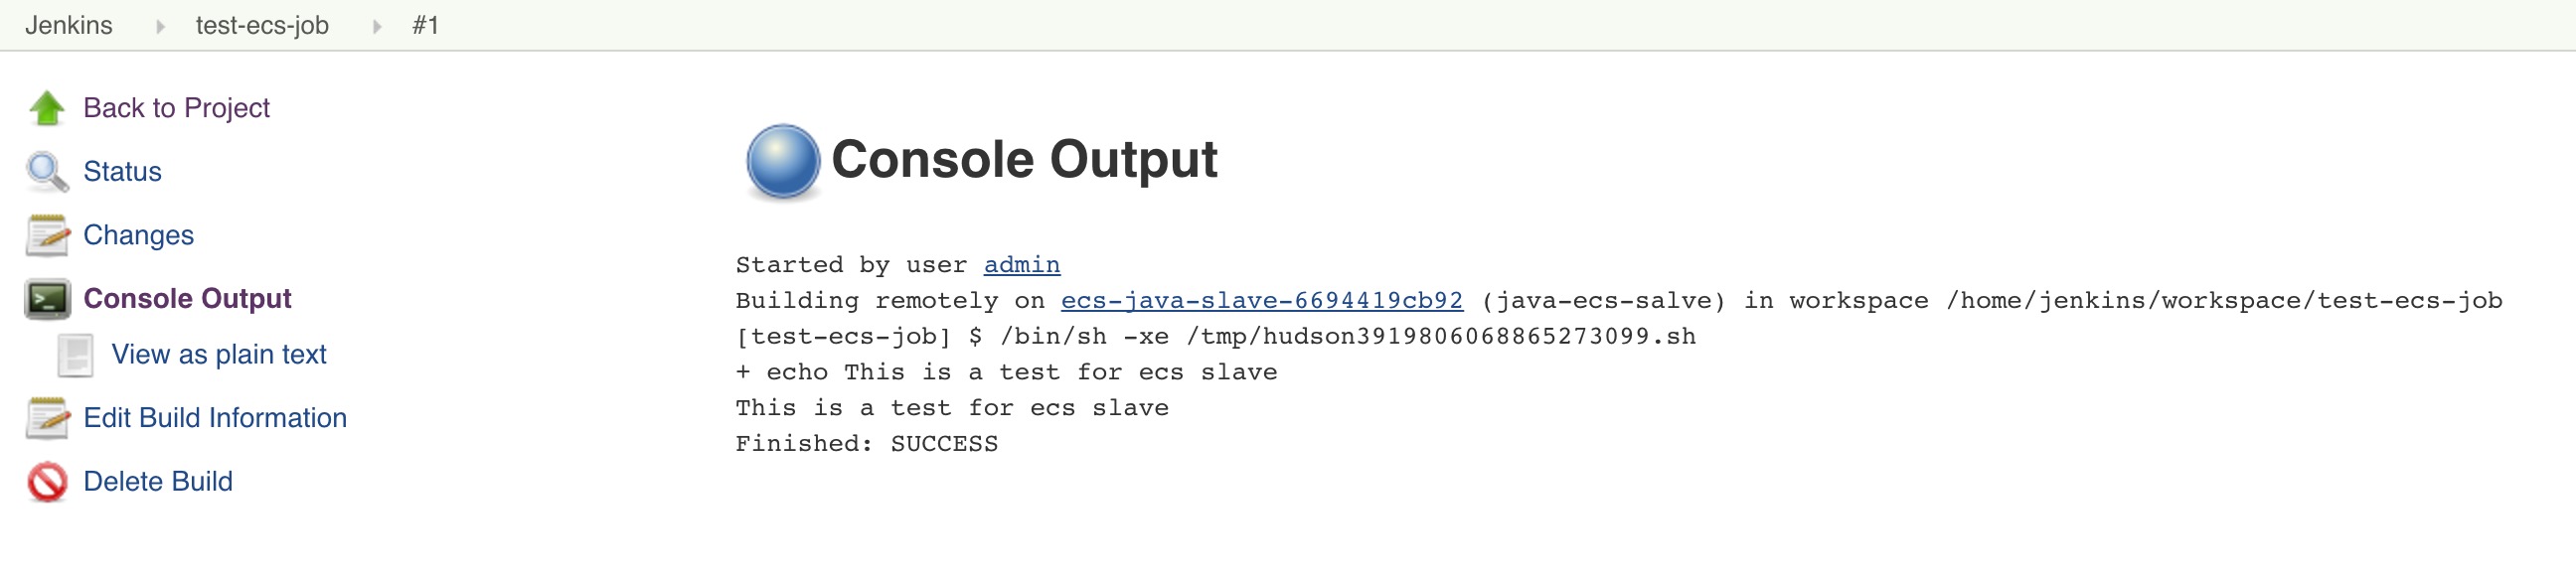
3. Under Build select the execute shell option and type an echo statement as shown below.
echo "This is a test for ecs slave"
4. Save and job and click build now
The build will go the pending start once it deploys the container. Once it executes the shell the container will be destroyed from ECS.
If you click the console output, you should get the following output.
Once you tested your configuration, you can create actual jobs by integrating with git and the build steps that you want. You need to configure the docker image based on your requirement.
For java based projects you can use the following cloudbees image as slave templates. It contains most of the java build dependencies.
ECS Cluster As Build Slave will save time and cost. If you have your applications of AWS, it is worth giving it a try. You can start with few applications and once you gain confidence, you can move the entire build fleet to ECS container based build pipelines
Once it is saved, the UI will be changed to a materialized flat UI based on cyan color.
Uploading Custom CSS TO Jenkins Server
In the above example, we are referring to a CSS file hosted in third party website. You can also host this CSS on your jenkins server. Follow the steps given below.
Step 1: Login to your jenkins server, and cd into your jenkins home directory.
Step2: Create folder named layout inside the userContent directory.
cd userContent
mkdir layout
Step 3: cd into layout directory and create a style.css file.
cd layout
vi style.css
Step 4: Now, visit the following URL in the browser and copy the whole CSS content and paste it in the style.css file and save it.
Step 4: Now, in the jenkins configure section, under the theme, replace the full URL with the following.
/userContent/layout/style.css
More Customization
You can customize the looks more by changing the logo. If you want more customizations and colors, you can follow the office jenkins materialize CSS site from here.