=========================================================================================================================
*************************************************************************************************************************
=========================================================================================================================
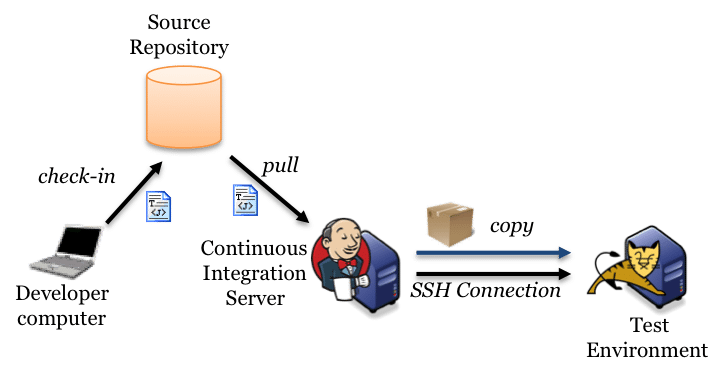
Puppet code should be available under a SCM (Git, Subversion, Mercurial... Repository ),We must be able to test the code before committing to production
Testing Puppet code syntax is easy, testing its effects is not.
Different testing methods for different purposes,Different code workflow options
Mapping the Puppet code base against the environments shows the power of this method. People often use a version control system to manage the code,
and create a set of branches that each map to an environment. Adopting the development, testing and production workflow, we can have a puppet.conf
Modern distributed version control systems like Git handle these constraints by making branch creation and merging lightweight operations, allowing us to generate Puppet
environments on the fly. Puppet can set up environments with an explicitly defined section in the configuration file, but we can exploit the fact Puppet will set the
$environment variable to the name of environment it is currently running under. With this in mind, we can write a puppet.conf to resemble this:
[main]
server = puppet.example.com
environment = production
confdir = /etc/puppet
[master]
environment = production
manifest = $confdir/environments/$environment/manifests/site.pp
modulepath = $confdir/environments/$environment/modules
[agent]
report = true
show_diff = true
environment = production
This handles the dynamic environment aspect; all we have to do is create a directory with manifests in $confdir/environments and we have created that environment.
Generating new environments using Git is similarly easy. We can create a central Git repository somewhere, with a post-receive hook that looks something like this:
(Make sure that the post receive hook is executable!)
Creating and using a new environment
% git branch
* production
% git checkout -b new_feature
Switched to a new branch 'new_feature'
% mvim site.pp
% git add site.pp
% git commit -m 'Implemented my feature'
[new_feature 25a9e1b] Implemented my feature
1 files changed, 1 insertions(+), 0 deletions(-)
% git push origin new_feature
Counting objects: 5, done.
Writing objects: 100% (3/3), 255 bytes, done.
Total 3 (delta 0), reused 0 (delta 0)
Unpacking objects: 100% (3/3), done.
remote: Creating new environment new_feature
To git@git.host:deploy.git
* [new branch] new_feature -> new_feature
And from here on out, you can use the new_feature environment on your hosts, and use git like you would with any code base.
=========================================================================================================================
*************************************************************************************************************************
=========================================================================================================================
Installation
Debian, Ubuntu
Available by default
apt-get install puppet # On clients (nodes)
apt-get install puppetmaster # On server (master)
RedHat, Centos, Fedora
Add EPEL repository or RHN Extra channel
yum install puppet # On clients (nodes)
yum install puppet-server # On server (master)
---------------------------------------------------
Puppet Language
A Declarative Domain Specific Language (DSL),It defines STATES (Not procedures).
Puppet code is written in manifests (files with .pp extension)
In the code we declare resources that affect elements of the system (files, packages, services ...)
Resources are grouped in classes which may expose parameters that affect their behavior.
Classes and configuration files are organized in modules
-----------------------------------------------------------------
Puppet Versions
From version 2 Puppet follows Semantic Versioning standards to manage versioning, with a pattern like: MAJOR.MINOR.PATCH
This implies that MAYOR versions might not be backwards compatible, MINOR versions may introduce new features keeping compatibility and PATCHes are for backwards compatible bug fixes.
This is the history of the main Puppet versions and some relevant changes
Check also Puppet Language History for a more complete review:
0.9.x - First public beta
0.10.x - 0.21.x - Various "early" versions
0.22.x - 0.25.x - Improvements and OS wider support
2.6.x - Many changes. Parametrized classes
2.7.x - Windows support
3.0.x - Many changes. Disabled dynamic variables scope. Data bindings
3.2.x - Future parser (experimental, will be default in Puppet 4)
4.x.x - Release in early 2015. New parser, new type system and lot of changes, some backwards incompatibilities
5
-------------------------------------------------------------------------------------
Software related to Puppet:
Facter - Complementary tool to retrieve system's data
MCollective - Infrastructure Orchestration framework
Hiera - Key-value lookup tool where Puppet data can be placed
PuppetDB - Stores all the data generated by Puppet
Puppet DashBoard - A Puppet Web frontend and External Node Classifier (ENC)
The Foreman - A well-known third party provisioning tool and Puppet ENC
Geppetto - A Puppet IDE based on Eclipse
=========================================================================================================================
*************************************************************************************************************************
=========================================================================================================================
FACTER
=============
Facter is Puppet’s cross-platform system profiling library. It discovers and reports per-node facts, which are available in your Puppet manifests as variables.
Facter runs on clients and collects facts that the server can use as variables
Developing Facts
Facts are generated on the client before the evaluation of the Puppet code on the server.Facts provide variables that can be used in Puppet code and templates.
A simple custom type that just executes a shell command:
require 'facter'
Facter.add("last_run") do
setcode do
Facter::Util::Resolution.exec('date')
end
end
This file should be placed in /lib/facter/acpi_available.rb
al$ facter
architecture => x86_64
fqdn => Macante.example42.com
hostname => Macante
interfaces => lo0,eth0
ipaddress => 10.42.42.98
ipaddress_eth0 => 10.42.42.98
kernel => Linux
macaddress => 20:c9:d0:44:61:57
macaddress_eth0 => 20:c9:d0:44:61:57
memorytotal => 16.00 GB
netmask => 255.255.255.0
operatingsystem => Centos
operatingsystemrelease => 6.3
osfamily => RedHat
virtual => physical
=========================================================================================================================
*************************************************************************************************************************
=========================================================================================================================
MCOLLECTIVE - INFRASTRUCTURE ORCHESTRATION FRAMEWORK
The Marionette Collective, also known as MCollective, is a framework for building server orchestration or parallel job-execution systems. Most users programmatically execute administrative tasks on clusters of servers.
MCollective has some unique strengths for working with large numbers of servers:
•Instead of relying on a static list of hosts to command, it uses metadata-based discovery and filtering. It can use a rich data source like PuppetDB, or can perform real-time discovery across the network.
•Instead of directly connecting to each host (which can be resource-intensive and slow), it uses publish/subscribe middleware to communicate in parallel with many hosts at once.
ping------>Publish Model
------>Subscribe Model
MCollective is licensed under the Apache License, Version 2.0. , MCollective is pluggable in the following areas:
•Replace our STOMP-compliant middleware with your own, such as something AMQP-based.---------------------->ActiveMQ
•Replace our authorization system with one that suits your local needs------------------------------------>MCollective-Server
•Replace our Ruby Marshal and YAML-based serialization with your own, such as cross-language JSON Schema--------JSON
Based on 3 components:
One or more central consoles, from where the mco command can be issued
The infrastructure nodes, where an agent receives and executes the requested actions
A middleware message broker, that allows communication between master(s) and agents
Possible actions are based on plugins
Common plugins are: service, package, puppetd, filemgr...
Simple RCPs allow easy definitions of new plugins or actions.
Security is handled at different layers: transport, authentication and authorization via different plugins. Here is a Security Overview
Installation
==============
On the nodes to be managed just install the mcollective package, it's configuration file is /etc/mcollective/server.cfg
On the administrative nodes, from where to control the infrastructure, install the mcollective-client package, it's configuration file is /etc/mcollective/client.cfg
On both clients and servers we have to install the agent plugins
On the middleware server(s) install activemq or rabbitmq
Configuration
==============
Configuration files are similar for server and client.They are in a typical setting = value format and # are used for comments.
We have to define to connetion settings to the middleware, the settings for the chosen security plugins, the facts source and other general settings.
The setup of the whole infrastructure involves some parameters to be consistent on the mcollective config files and the message broker ones (credentials and eventually certificates).
There can be different setups, according to the security plugins used, the recommended one is well described in the Standard Mcollective Deployment
Using the mco command
The mco command is installed on the Mcollective clients and can be used to perform actions on any node of the infrastructure.
General usage:
=================
mco [subcommand] [options] [filters]
mco rpc [options] [filters] <agent> <action> [<key=val> <key=val>]
Most used subcommands are ping , rpc , inventory, find
Most used options are: -batch SIZE (send requests in batches), -q (quiet), -j (produce Json output), -v (verbose)
Most used filters are: -F <fact=val> (Match hosts with the specified fact value), -I (Match host with the given name).
Sample commands:
mco help
mco help rpc
mco ping
mco rpc service status service=mysqld
mco ping -F datacenter=eu-1
=========================================================================================================================
*************************************************************************************************************************
=========================================================================================================================
HIERA
------
Hiera is a key/value lookup tool for configuration data, built to make Puppet better and let you set node-specific data without repeating yourself.
Hiera is the key/value lookup tool of reference where to store Puppet user data.
It provides an highly customizable way to lookup for parameters values based on a custom hierarchy using many different backends for data storage.
It provides a command line tool hiera that we can use to interrogate direclty the Hiera data and functions to be used inside Puppet manifests: hiera() , hiera_array() , hiera_hash() , hiera_include()
Hiera is installed by default with Puppet version 3 and is available as separated download on earlier version (Installation instructions).
We need Hiera only on the PuppetMaster (or on any node, if we have a masterless setup).
Hiera configuration: hiera.yaml
Hiera's configuration file is in yaml format and is called hiera.yaml here we define the hierarchy we want to use and the backends where data is placed, with backend specific settings.
Hiera's configuration file path is different according to how it's invoked:
From the Command Line and Ruby code
Default path: /etc/hiera.yaml
From Puppet
Default path for Puppet OpenSource: /etc/puppet/hiera.yaml
Default path for Puppet Enterprise: /etc/puppetlabs/puppet/hiera.yaml
It's good practice the symlink these alternative configuration files in order to avoid inconsistencies when using Hiera from the shell line or within Puppet manifests:
ln -s /etc/hiera.yaml /etc/puppet/hiera.yaml
Default configuration
By default Hiera does not provide a configuration file. The default settings are equivalent to this:
---
:backends: yaml
:yaml:
:datadir: /var/lib/hiera
:hierarchy: common
:logger: console
------------------------------------------------------------------
The lookup function uses Hiera to retrieve a value for a given key. By default, this returns the first value found (and fails compilation if no values are available), but you can configure it to merge multiple values into one, fail gracefully, and more.
When looking up a key, Hiera searches up to three tiers of data, in the following order:
1.Hiera.
2.The current environment’s data provider.
3.The indicated module’s data provider, if the key is of the form <MODULE NAME>::<SOMETHING>.
Note: Hiera always checks the global layer before the environment layer. If no global hiera.yaml file has been configured, Hiera defaults are used. If you don’t want it to use the defaults, you can create an empty hiera.yaml in /etc/puppetlabs/puppet/data/.
Arguments
You must provide the name of a key to look up, and can optionally provide other arguments. You can combine these arguments in the following ways:
•lookup( <NAME>, [<VALUE TYPE>], [<MERGE BEHAVIOR>], [<DEFAULT VALUE>] )
•lookup( [<NAME>], <OPTIONS HASH> )
•lookup( as above ) |$key| { # lambda returns a default value }
Arguments in [square brackets] are optional.
-----------------------------------------------------------------------
Hiera Backends
One powerful feature of Hiera is that the actual key-value data can be retrieved from different backends.
With the :backends global configuration we define which backends to use, then, for each used backend we can specify backend specific settings.
Build it backends:
yaml - Data is stored in yaml files (in the :datadir directory)
json - Data is stored in json files (in the :datadir directory)
puppet - Data is defined in Puppet (in the :datasouce class)
Extra backends:
Many additional backends are available, the most interesting ones are:
gpg - Data is stored in GPG encripted yaml files
http - Data is retrieved from a REST service
mysql - Data is retrieved from a Mysql database
redis - Data is retrieved from a Redis database
Custom backends
It's relatively easy to write custom backends for Hiera. Here are some development instructions
-------------------------------------------------
Hierarchies
With the :hierarchy global setting we can define a string or an array of data sources which are checked in order, from top to bottom.
When the same key is present on different data sources by default is chosen the top one. We can override this setting with the :merge_behavior global configuration. Check this page for details.
In hierarchies we can interpolate variables with the %{} notation (variables interpolation is possible also in other parts of hiera.yaml and in the same data sources).
This is an example Hierarchy:
---
:hierarchy:
- "nodes/%{::clientcert}"
- "roles/%{::role}"
- "%{::osfamily}"
- "%{::environment}"
- common
Note that the referenced variables should be expressed with their fully qualified name. They are generally facts or Puppet's top scope variables (in the above example, $::role is not a standard fact, but is generally useful to have it (or a similar variable that identifies the kind of server) in our hierarchy).
If we have more backends, for each backend is evaluated the full hierarchy.
--------------------------------------------------------------------------------
Using Hiera in Puppet
The data stored in Hiera can be retrieved by the PuppetMaster while compiling the catalog using the hiera() function.
In our manifests we can have something like this:
$my_dns_servers = hiera("dns_servers")
Which assigns to the variable $my_dns_servers (can have any name) the top value retrieved by Hiera for the key dns_servers
We may prefer, in some cases, to retrieve all the values retrieved in the hierarchy's data sources of a given key and not the first use, use hiera_array() for that.
$my_dns_servers = hiera_array("dns_servers")
If we expect an hash as value for a given key we can use the hiera() function to retrieve the top value found or hiera_hash to merge all the found values in a single hash:
$openssh_settings = hiera_hash("openssh_settings")
Extra parameters
All these hiera functions may receive additional parameters:
Second argument: default value if no one is found
Third argument: override with a custom data source added at the top of the configured hierarchy
$my_dns_servers = hiera("dns_servers","8.8.8.8","$country")
----------------------------------------------------------------
Puppet 3 data bindings
With Puppet 3 Hiera is shipped directly with Puppet and an automatic hiera lookup is done for each class' parameter using the key $class::$argument: this functionality is called data bindings or automatic parameter lookup.
For example in a class definition like:
class openssh (
template = undef,
) { . . . }
Puppet 3 automatically looks for the Hiera key openssh::template if no value is explitely set when declaring the class.
To emulate a similar behaviour on pre Puppet 3 we should write something like:
class openssh (
template = hiera("openssh::template"),
) { . . . }
If a default value is set for an argument that value is used only when user has not explicitly declared value for that argument and Hiera automatic lookup for that argument doesn't return any value.
----------------------------------------------------------------------
Using hiera from the command line
Hiera can be invoken via the command line to interrogate the given key's value:
hiera dns_servers
This will return the default value as no node's specific information is provided. More useful is to provide the whole facts' yaml of a node, so that the returned value can be based on the dynamic values of the hierarchy.
On the Pupppet Masters the facts of all the managed clients are collected in $vardir/yaml/facts so this is the best place to see how Hiera evaluates keys for different clients:
hiera dns_servers --yaml /var/lib/puppet/yaml/facts/<node>.yaml
We can also pass variables useful to test the hierarchy, directly from the command line:
hiera ntp_servers operatingsystem=Centos
hiera ntp_servers operatingsystem=Centos hostname=jenkins
To have a deeper insight of Hiera operations use the debug (-d) option:
hiera dns_servers -d
To make an hiera array lookup (equivalent to hiera_array()):
hiera dns_servers -a
To make an hiera hash lookup (equivalent to hiera_hash()):
hiera openssh::settings -h
=========================================================================================================================
*************************************************************************************************************************
=========================================================================================================================
PuppetDB
========
PuppetDB collects data generated by Puppet. It enables advanced Puppet features like the inventory service and exported resources, and can be the foundation for other applications
that use Puppet’s data.
What Data?
In version 1, PuppetDB stores:
•The most recent facts from every node
•The most recent catalog for every node
Together, these give you a huge inventory of metadata about every node in your infrastructure and a searchable database of every single resource being managed on any node.
Puppet itself can search a subset of this data using exported resources, which allow nodes to manage resources on other nodes. This is similar to the capabilities of the legacy
ActiveRecord storeconfigs interface, but much, much faster. The remaining data is available through PuppetDB’s query APIs (see navigation sidebar for details) and Puppet’s inventory service.
=========================================================================================================================
*************************************************************************************************************************
=========================================================================================================================
Puppet DashBoard - A Puppet Web frontend and External Node Classifier (ENC)
Puppet Dashboard is a web interface for Puppet. It can view and analyze Puppet reports, assign Puppet classes and parameters to nodes, and view inventory data
and backed-up file contents.
=========================================================================================================================
*************************************************************************************************************************
=========================================================================================================================
The Foreman - A well-known third party provisioning tool and Puppet ENC
Foreman is a complete lifecycle management tool for physical and virtual servers. We give system administrators the power to easily automate repetitive tasks,
quickly deploy applications, and proactively manage servers, on-premise or in the cloud.
=========================================================================================================================
*************************************************************************************************************************
=========================================================================================================================
Geppetto - A Puppet IDE based on Eclipse: an integrated toolset for developing Puppet modules and manifests
=========================================================================================================================
*************************************************************************************************************************
=========================================================================================================================
Masterless:puppet apply (generally as root)
Client/Server: Command used on the client: puppet agent -t (generally as root) and Command used on the server: puppet master (generally as puppet)
List all certificates: signed (+), revoked (-), to sign ( ): puppet cert list --all
Sign a client certificate: puppet cert sign <certname>
Remove a client certificate: puppet cert clean <certname>
To view all or a specific configuration setting: puppet config print all ; puppet config print modulepath
puppet.conf: It's Puppet main configuration file. /etc/puppet/puppet.conf for Enterprise /etc/puppetlabs/puppet/puppet.conf
Useful paths
======================
/var/log/puppet contains logs (but also on normal syslog files, with facility daemon), both for agents and master
/var/lib/puppet contains Puppet operational data (catalog, certs, backup of files...)
/var/lib/puppet/ssl contains SSL certificate
/var/lib/puppet/clientbucket contains backup copies of the files changed by Puppet
/etc/puppet/manifests/site.pp (On Master) The first manifest that the master parses when a client connects in order to produce the configuration to apply to it (Default on Puppet < 3.6 where are used config-file environments)
/etc/puppet/environments/production/manifests/site.pp (On Master) The first manifest that the master parses when using directory environments (recommended from Puppet 3.6 and default on Puppt >= 4)
/etc/puppet/modules and /usr/share/puppet/modules (On Master) The default directories where modules are searched
/etc/puppet/environments/production/modules (On Master) An extra place where modules are looked for when using directory environments
Other configuration files:
==============================
auth.conf :Defines ACLs to access Puppet's REST interface. Details.
fileserver.conf: Used to manage ACL on files served from sources different than modules Details.
puppetdb.conf: Settings for connection to PuppetDB, if used. Details.
tagmail.conf , autosign.conf , device.conf , routes.yaml.
These are other configuration files for specific functions. Details
/etc/puppet/environments/production/environment.conf
Contains environment specific settings
Testing Modules
===============
Puppet code testing can be done at different levels with different tools
puppet parser validate <manifest.pp> - Checks the syntax of a manifest
puppet-lint <manifest.pp> - A gem that checks the style of a manifest
puppet-rspec - A gem that runs rspec unit tests on a module (Based on compiled catalog)
cucumber-puppet - A gem that runs cucumber tests a module (Based on compiled catalog) OBSOLETE
puppet-rspec-system - A gem that creates Vagrant VM and check for the expected results of real Puppet runs.
Beaker - A gem that runs acceptance tests on multiple Vagrant VM
=========================================================================================================================
*************************************************************************************************************************
=========================================================================================================================
Puppet Configuration and basic usage - Overview
Operational modes: apply / agent.
Masterless - puppet apply , Our Puppet code (written in manifests) is applied directly on the target system.
No need of a complete client-server infrastructure.Have to distribute manifests and modules to the managed nodes.
Command used: puppet apply (generally as root)
Master / Client - puppet agent
We have clients, our managed nodes, where Puppet client is installed.And we have one or more Masters where Puppet server runs as a service
Client/Server communication is via https (port 8140).Clients certificates have to be accepted (signed) on the Master
Command used on the client: puppet agent (generally as root)
Command used on the server: puppet master (generally as puppet)
A Puppet server (running as 'puppet') listening on 8140 on the Puppet Master (the server ).A Puppet client (running as 'root') on each managed node.
Client can be run as a service (default), via cron (with random delays), manually or via MCollective.
Client and Server have to share SSL certificates. New client certificates must be signed by the Master CA
It's possible to enable automatic clients certificates signing on the Master (be aware of security concerns)
CERTIFICATES MANAGEMENT
On the Master we can use puppet cert to manage certificates
List the (client) certificates to sign:
puppet cert list
List all certificates: signed (+), revoked (-), to sign ( ):
puppet cert list --all
Sign a client certificate:
puppet cert sign <certname>
Remove a client certificate:
puppet cert clean <certname>
Client stores its certificates and the server's public one in $vardir/ssl** (/var/lib/puppet/ssl on Puppet OpenSource)
Server stores clients public certificates and in $vardir/ssl/ca (/var/lib/puppet/ssl/ca). DO NOT remove this directory.
Certificates management - First run
By default the first Puppet run on a client fails:
client # puppet agent -t
# "Exiting; no certificate found and waitforcert is disabled"
An optional `--waitforcert 60 parameter makes client wait 60 seconds before giving up.
The server has received the client's CSR which has to be manually signed:
server # puppet cert sign <certname>
Once signed on the Master, the client can connect and receive its catalog:
client # puppet agent -t
If we have issues with certificates (reinstalled client or other certs related problemes):
Be sure client and server times are synced
Clean up the client certificate. On the client remove it:
client # mv /var/lib/puppet/ssl /var/lib/puppet/ssl.old
On the Master clean the old client certificate:
server # puppet cert clean <certname>
=====================================
Puppet configuration: puppet.conf
It's Puppet main configuration file.
On opensource Puppet is generally in:/etc/puppet/puppet.conf
On Puppet Enterprise:/etc/puppetlabs/puppet/puppet.conf
When running as a normal user can be placed in the home directory:
/home/user/.puppet/puppet.conf
Configurations are divided in [stanzas] for different Puppet sub commands
Common for all commands: [main]
For puppet agent (client): [agent] (Was [puppetd] in Puppet pre 2.6)
For puppet apply (client): [user] (Was [puppet])
For puppet master (server): [master] (Was [puppetmasterd] and [puppetca])
Hash sign (#) can be used for comments
Main configuration options
To view all or a specific configuration setting:
puppet config print all
puppet config print modulepath
Important options under [main] section:
vardir: Path where Puppet stores dynamic data.
ssldir: Path where SSL certifications are stored.
Under [agent] section:
server: Host name of the PuppetMaster. (Default: puppet)
certname: Certificate name used by the client. (Default is its fqdn)
runinterval: Number of minutes between Puppet runs, when running as service. (Default: 30)
report: If to send Puppet runs' reports to the **report_server. (Default: true)
Under [master] section:
autosign: If new clients certificates are automatically signed. (Default: false)
reports: How to manage clients' reports (Default: store)
storeconfigs: If to enable store configs to support exported resources. (Default: false)
========================================================================
Useful paths
/var/log/puppet contains logs (but also on normal syslog files, with facility daemon), both for agents and master
/var/lib/puppet contains Puppet operational data (catalog, certs, backup of files...)
/var/lib/puppet/ssl contains SSL certificate
/var/lib/puppet/clientbucket contains backup copies of the files changed by Puppet
/etc/puppet/manifests/site.pp (On Master) The first manifest that the master parses when a client connects in order to produce the configuration to apply to it (Default on Puppet < 3.6 where are used config-file environments)
/etc/puppet/environments/production/manifests/site.pp (On Master) The first manifest that the master parses when using directory environments (recommended from Puppet 3.6 and default on Puppt >= 4)
/etc/puppet/modules and /usr/share/puppet/modules (On Master) The default directories where modules are searched
/etc/puppet/environments/production/modules (On Master) An extra place where modules are looked for when using directory environments
Other configuration files:
auth.conf :Defines ACLs to access Puppet's REST interface. Details.
fileserver.conf: Used to manage ACL on files served from sources different than modules Details.
puppetdb.conf: Settings for connection to PuppetDB, if used. Details.
tagmail.conf , autosign.conf , device.conf , routes.yaml.
These are other configuration files for specific functions. Details
/etc/puppet/environments/production/environment.conf
Contains environment specific settings
=============================================================================
Anatomy of a Puppet Run - Part 1: Catalog compilation
Execute Puppet on the client
Client shell # puppet agent -t,If pluginsync = true (default from Puppet 3.0) the client retrieves all extra plugins (facts, types and providers) present in modules on the server's $modulepath
Client output # Info: Retrieving plugin,The client runs facter and send its facts to the server. Client output # Info: Loading facts in /var/lib/puppet/lib/facter/... [...]
The server looks for the client's hostname (or certname, if different from the hostname) and looks into its nodes list
The server compiles the catalog for the client using also client's facts
Server's logs # Compiled catalog for in environment production in 8.22 seconds
If there are not syntax errors in the processed Puppet code, the server sends the catalog to the client, in PSON format.
Puppet Configuration and basic usage - Practice
Use the command puppet config print to explore Puppet's configuration options.
Give a look to the various Puppet related directories and their contents:
/etc/puppet, /var/lib/puppet, /var/log/puppet
============================================================================================================================================================
**********************************************************************************************************************************************************
=========================================================================================================================================================
Puppet architectures - Overview
The Components of a Puppet architecture,?Where to define classes,?Where to define parameters,?Where to place files.
Puppet security
The Components of a Puppet architecture
Definition of the classes to be included in each node,Definition of the parameters to use for each node and Definition of the configuration files provided to the nodes.
Components
==============
/etc/puppet/manifests/site.pp - The default manifests loaded by the Master.
ENC - The (optional) Enternal Node Classifier
ldap - (Optional) LDAP backend
Hiera - Data key-value backend
Public modules - Public shared modules
Site modules - Local custom modules
-------------------------------------------------
Where to define classes
The classes to include in each node can be defined on: /etc/puppet/manifests/site.pp - Top or Node scope variables
ENC - Under the classes key in the provided YAML
ldap - puppetClass attribute
Hiera - Via the hiera_include() function
Site modules - In roles and profiles or other grouping classes
--------------------------------------------------------------
Where to define parameters
The Parameters to include in each node can be defined on: /etc/puppet/manifests/site.pp - Under the node statement
ENC - Following the ENC logic
ldap - puppetVar attribute
Hiera - Via the hiera(), hiera_hash(), hiera_array() functions of Puppet 3 Data Bindings
Shared modules - OS related settings
Site modules - Custom and logical settings
Facts - Facts calculated on the client
------------------------------------------------------------
Where to define files
Shared modules - Default templates populated via module's params
Site modules - All custom static files and templates
Hiera - Via the hiera-file plugin
Fileserver custom mount points
------------------------------------------------------------------
Puppet Security considerations
Client / Server communications are encrypted with SSL x509 certificates. By default the CA on the PuppetMaster requires manual signing of certificate requests
# In puppet.conf under [master] section:
autosign = false
On the Puppet Master (as unprivileged user) runs a service that must be reached by every node (port 8140 TCP)
On the Client Puppet runs a root but does not expose a public service
Sensitive data might be present in the catalog and in reports
Sensitive data might be present in the puppet code (Propagated under a SCM)
========================================================================================================
Reporting
In reports Puppet stores information of what has changed on the system after a Puppet run
Reports are sent from the client to the Master, if report is enabled
# On client's puppet.conf [agent]
report = true
On the Master different report processors may be enabled
# On server's puppet.conf [master]
reports = log,tagmail,store,https
reporturl = http://localhost:3000/reports
Understanding Puppet runs output
Puppet is very informative about what it does on the functions
/Stage[main]/Example42::CommonSetup/File[/etc/motd]/content:
--- /etc/motd 2012-12-13 10:37:29.000000000 +0100
+++ /tmp/puppet-file20121213-19295-qe4wv2-0 2012-12-13 10:38:19.000000000 +0100
@@ -4,4 +4,4 @@
-Last Puppet Run: Thu Dec 13 10:36:58 CET 2012
+Last Puppet Run: Thu Dec 13 10:38:00 CET 2012
Info: /Stage[main]/Example42::CommonSetup/File[/etc/motd]: Filebucketed /etc/motd to main with sum 623bcd5f8785251e2cd00a88438d6d08
/Stage[main]/Example42::CommonSetup/File[/etc/motd]/content: content changed '{md5}623bcd5f8785251e2cd00a88438d6d08' to '{md5}91855575e2252c38ce01efedf1f48cd3'
The above lines refer to a change made by Puppet on /etc/motd
The File[/etc/motd] resource is defined in the class example42::commonsetup
A diff is shown of what has changed (the diff appears when running puppet agent -t in interactive mode)
The original file has been filebucketed (saved) with checksum 623bcd5f8785251e2cd00a88438d6d08
We can retrieve the original file in /var/lib/puppet/clientbucket/6/2/3/b/c/d/5/f/623bcd5f8785251e2cd00a88438d6d08/contents
We can search for all the old versions of /etc/motd with
grep -R '/etc/motd' /var/lib/puppet/clientbucket/*
=======================================================================================
Developing Types
Resource types can be defined in Puppet language or in Ruby as plugins.
Ruby types require one or more providers which manage low-lovel interaction with the underlining OS to provide the more abstact resource defined in Types.
An example of a type with many providers is package, which has more than 20 providers that manage packages on different OS.
A sample type structure (A type called vcsrepo, must have a path like /lib/puppet/type/vcsrepo.rb
require 'pathname'
Puppet::Type.newtype(:vcsrepo) do
desc "A local version control repository"
feature :gzip_compression,
"The provider supports explicit GZip compression levels"
[...] List of the features
ensurable do
newvalue :present do
provider.create
end
[...] List of the accepted values
newparam(:source) do
desc "The source URI for the repository"
end
[...] List of the accepted parameters
end
=======================================================================================
Developing Providers
The vcsrepo type seen before has 5 different providers for different source control tools.
Here is, as an example, the git provider for the vcsrepo type (Code (C) by PuppetLabs):
This file should be placed /lib/puppet/provider/vcsrepo/git.rb
require File.join(File.dirname(__FILE__), '..', 'vcsrepo')
Puppet::Type.type(:vcsrepo).provide(:git, :parent => Puppet::Provider::Vcsrepo) do
desc "Supports Git repositories"
commands :git => 'git'
defaultfor :git => :exists
has_features :bare_repositories, :reference_tracking
def create
if !@resource.value(:source)
init_repository(@resource.value(:path))
else
clone_repository(@resource.value(:source), @resource.value(:path))
if @resource.value(:revision)
if @resource.value(:ensure) == :bare
notice "Ignoring revision for bare repository"
else
checkout_branch_or_reset
end
end
if @resource.value(:ensure) != :bare
update_submodules
end
end
end
def destroy
FileUtils.rm_rf(@resource.value(:path))
end
[...]
end
=====================================================================================
Developing Functions
Functions are Ruby code that is executed during compilation on the Puppet Master.
They are used to interface with external tools, provide debugging or interpolate strings.
Importants parts of the Puppet language like include and template are implemented as functions.
module Puppet::Parser::Functions
newfunction(:get_magicvar, :type => :rvalue, :doc => <<-EOS
This returns the value of the input variable. For example if you input role
it returns the value of $role'.
EOS
) do |arguments|
raise(Puppet::ParseError, "get_magicvar(): Wrong number of arguments " +
"given (#{arguments.size} for 1)") if arguments.size < 1
my_var = arguments[0]
result = lookupvar("#{my_var}")
result = 'all' if ( result == :undefined || result == '' )
return result
end
end
This file is placed in puppi/lib/puppet/parser/functions/get_magicvar.rb.
==========================================================================================
Optimize code for performance
Reduce the number of resources per node
For each resource Puppet has to serialize, deserialize, apply, report...
Avoid use of resources for too many entities (Do manage hundreds of users with the User type)
Limit overhead of containing classes
(A module with the openssh::package, openssh::service, openssh::configuration subclasses pattern is uselessly filled with extra resources)
Do not use the file type to deliver too large files or binaries:
For each file Puppet has to make a checksum to verify if it has changed
With source => , the content of the file is retrieved with a new connection to the PuppetMaster
With content => template() , the content is placed inside the catalog.
Avoid too many elements in a source array for file retrieval:
source => [ "site/openssh/sshd.conf---$::hostname ,
"site/openssh/sshd.conf--$environemnt-$role ,
"site/openssh/sshd.conf-$role ,
"site/openssh/sshd.conf ],
This checks 3 files (and eventually gets 3 404 errors from server) before getting the default ones.
Reduce PuppetMaster(s) load
Run Puppet less frequently (default 30 mins)
Evaluate centrally managed, on-demand, Puppet Runs (ie: via MCollective)
Evaluate Master-less setups
Use a setup with Passenger to have multiple PuppetMasters childs on different CPUs
Disable Store Configs if not used
storeconfigs = false
Alternatively enable Thin Store Configs and Mysql backend
storeconfigs = true
thin_storeconfigs = true
dbadapter = mysql
dbname = puppet
dbserver = mysql.example42.com
dbuser = puppet
dbpassword = <%= scope.lookupvar('secret::puppet_db_password') %>
Evaluate PuppetDB as backend (faster)
storeconfigs = true
storeconfigs_backend = puppetdb
===============================================================================================
*************************************************************************************************************************
=========================================================================================================================
Puppet code should be available under a SCM (Git, Subversion, Mercurial... Repository ),We must be able to test the code before committing to production
Testing Puppet code syntax is easy, testing its effects is not.
Different testing methods for different purposes,Different code workflow options
Mapping the Puppet code base against the environments shows the power of this method. People often use a version control system to manage the code,
and create a set of branches that each map to an environment. Adopting the development, testing and production workflow, we can have a puppet.conf
Modern distributed version control systems like Git handle these constraints by making branch creation and merging lightweight operations, allowing us to generate Puppet
environments on the fly. Puppet can set up environments with an explicitly defined section in the configuration file, but we can exploit the fact Puppet will set the
$environment variable to the name of environment it is currently running under. With this in mind, we can write a puppet.conf to resemble this:
[main]
server = puppet.example.com
environment = production
confdir = /etc/puppet
[master]
environment = production
manifest = $confdir/environments/$environment/manifests/site.pp
modulepath = $confdir/environments/$environment/modules
[agent]
report = true
show_diff = true
environment = production
This handles the dynamic environment aspect; all we have to do is create a directory with manifests in $confdir/environments and we have created that environment.
Generating new environments using Git is similarly easy. We can create a central Git repository somewhere, with a post-receive hook that looks something like this:
(Make sure that the post receive hook is executable!)
Creating and using a new environment
% git branch
* production
% git checkout -b new_feature
Switched to a new branch 'new_feature'
% mvim site.pp
% git add site.pp
% git commit -m 'Implemented my feature'
[new_feature 25a9e1b] Implemented my feature
1 files changed, 1 insertions(+), 0 deletions(-)
% git push origin new_feature
Counting objects: 5, done.
Writing objects: 100% (3/3), 255 bytes, done.
Total 3 (delta 0), reused 0 (delta 0)
Unpacking objects: 100% (3/3), done.
remote: Creating new environment new_feature
To git@git.host:deploy.git
* [new branch] new_feature -> new_feature
And from here on out, you can use the new_feature environment on your hosts, and use git like you would with any code base.
=========================================================================================================================
*************************************************************************************************************************
=========================================================================================================================
Installation
Debian, Ubuntu
Available by default
apt-get install puppet # On clients (nodes)
apt-get install puppetmaster # On server (master)
RedHat, Centos, Fedora
Add EPEL repository or RHN Extra channel
yum install puppet # On clients (nodes)
yum install puppet-server # On server (master)
---------------------------------------------------
Puppet Language
A Declarative Domain Specific Language (DSL),It defines STATES (Not procedures).
Puppet code is written in manifests (files with .pp extension)
In the code we declare resources that affect elements of the system (files, packages, services ...)
Resources are grouped in classes which may expose parameters that affect their behavior.
Classes and configuration files are organized in modules
-----------------------------------------------------------------
Puppet Versions
From version 2 Puppet follows Semantic Versioning standards to manage versioning, with a pattern like: MAJOR.MINOR.PATCH
This implies that MAYOR versions might not be backwards compatible, MINOR versions may introduce new features keeping compatibility and PATCHes are for backwards compatible bug fixes.
This is the history of the main Puppet versions and some relevant changes
Check also Puppet Language History for a more complete review:
0.9.x - First public beta
0.10.x - 0.21.x - Various "early" versions
0.22.x - 0.25.x - Improvements and OS wider support
2.6.x - Many changes. Parametrized classes
2.7.x - Windows support
3.0.x - Many changes. Disabled dynamic variables scope. Data bindings
3.2.x - Future parser (experimental, will be default in Puppet 4)
4.x.x - Release in early 2015. New parser, new type system and lot of changes, some backwards incompatibilities
5
-------------------------------------------------------------------------------------
Software related to Puppet:
Facter - Complementary tool to retrieve system's data
MCollective - Infrastructure Orchestration framework
Hiera - Key-value lookup tool where Puppet data can be placed
PuppetDB - Stores all the data generated by Puppet
Puppet DashBoard - A Puppet Web frontend and External Node Classifier (ENC)
The Foreman - A well-known third party provisioning tool and Puppet ENC
Geppetto - A Puppet IDE based on Eclipse
=========================================================================================================================
*************************************************************************************************************************
=========================================================================================================================
FACTER
=============
Facter is Puppet’s cross-platform system profiling library. It discovers and reports per-node facts, which are available in your Puppet manifests as variables.
Facter runs on clients and collects facts that the server can use as variables
Developing Facts
Facts are generated on the client before the evaluation of the Puppet code on the server.Facts provide variables that can be used in Puppet code and templates.
A simple custom type that just executes a shell command:
require 'facter'
Facter.add("last_run") do
setcode do
Facter::Util::Resolution.exec('date')
end
end
This file should be placed in /lib/facter/acpi_available.rb
al$ facter
architecture => x86_64
fqdn => Macante.example42.com
hostname => Macante
interfaces => lo0,eth0
ipaddress => 10.42.42.98
ipaddress_eth0 => 10.42.42.98
kernel => Linux
macaddress => 20:c9:d0:44:61:57
macaddress_eth0 => 20:c9:d0:44:61:57
memorytotal => 16.00 GB
netmask => 255.255.255.0
operatingsystem => Centos
operatingsystemrelease => 6.3
osfamily => RedHat
virtual => physical
=========================================================================================================================
*************************************************************************************************************************
=========================================================================================================================
MCOLLECTIVE - INFRASTRUCTURE ORCHESTRATION FRAMEWORK
The Marionette Collective, also known as MCollective, is a framework for building server orchestration or parallel job-execution systems. Most users programmatically execute administrative tasks on clusters of servers.
MCollective has some unique strengths for working with large numbers of servers:
•Instead of relying on a static list of hosts to command, it uses metadata-based discovery and filtering. It can use a rich data source like PuppetDB, or can perform real-time discovery across the network.
•Instead of directly connecting to each host (which can be resource-intensive and slow), it uses publish/subscribe middleware to communicate in parallel with many hosts at once.
ping------>Publish Model
------>Subscribe Model
MCollective is licensed under the Apache License, Version 2.0. , MCollective is pluggable in the following areas:
•Replace our STOMP-compliant middleware with your own, such as something AMQP-based.---------------------->ActiveMQ
•Replace our authorization system with one that suits your local needs------------------------------------>MCollective-Server
•Replace our Ruby Marshal and YAML-based serialization with your own, such as cross-language JSON Schema--------JSON
Based on 3 components:
One or more central consoles, from where the mco command can be issued
The infrastructure nodes, where an agent receives and executes the requested actions
A middleware message broker, that allows communication between master(s) and agents
Possible actions are based on plugins
Common plugins are: service, package, puppetd, filemgr...
Simple RCPs allow easy definitions of new plugins or actions.
Security is handled at different layers: transport, authentication and authorization via different plugins. Here is a Security Overview
Installation
==============
On the nodes to be managed just install the mcollective package, it's configuration file is /etc/mcollective/server.cfg
On the administrative nodes, from where to control the infrastructure, install the mcollective-client package, it's configuration file is /etc/mcollective/client.cfg
On both clients and servers we have to install the agent plugins
On the middleware server(s) install activemq or rabbitmq
Configuration
==============
Configuration files are similar for server and client.They are in a typical setting = value format and # are used for comments.
We have to define to connetion settings to the middleware, the settings for the chosen security plugins, the facts source and other general settings.
The setup of the whole infrastructure involves some parameters to be consistent on the mcollective config files and the message broker ones (credentials and eventually certificates).
There can be different setups, according to the security plugins used, the recommended one is well described in the Standard Mcollective Deployment
Using the mco command
The mco command is installed on the Mcollective clients and can be used to perform actions on any node of the infrastructure.
General usage:
=================
mco [subcommand] [options] [filters]
mco rpc [options] [filters] <agent> <action> [<key=val> <key=val>]
Most used subcommands are ping , rpc , inventory, find
Most used options are: -batch SIZE (send requests in batches), -q (quiet), -j (produce Json output), -v (verbose)
Most used filters are: -F <fact=val> (Match hosts with the specified fact value), -I (Match host with the given name).
Sample commands:
mco help
mco help rpc
mco ping
mco rpc service status service=mysqld
mco ping -F datacenter=eu-1
=========================================================================================================================
*************************************************************************************************************************
=========================================================================================================================
HIERA
------
Hiera is a key/value lookup tool for configuration data, built to make Puppet better and let you set node-specific data without repeating yourself.
Hiera is the key/value lookup tool of reference where to store Puppet user data.
It provides an highly customizable way to lookup for parameters values based on a custom hierarchy using many different backends for data storage.
It provides a command line tool hiera that we can use to interrogate direclty the Hiera data and functions to be used inside Puppet manifests: hiera() , hiera_array() , hiera_hash() , hiera_include()
Hiera is installed by default with Puppet version 3 and is available as separated download on earlier version (Installation instructions).
We need Hiera only on the PuppetMaster (or on any node, if we have a masterless setup).
Hiera configuration: hiera.yaml
Hiera's configuration file is in yaml format and is called hiera.yaml here we define the hierarchy we want to use and the backends where data is placed, with backend specific settings.
Hiera's configuration file path is different according to how it's invoked:
From the Command Line and Ruby code
Default path: /etc/hiera.yaml
From Puppet
Default path for Puppet OpenSource: /etc/puppet/hiera.yaml
Default path for Puppet Enterprise: /etc/puppetlabs/puppet/hiera.yaml
It's good practice the symlink these alternative configuration files in order to avoid inconsistencies when using Hiera from the shell line or within Puppet manifests:
ln -s /etc/hiera.yaml /etc/puppet/hiera.yaml
Default configuration
By default Hiera does not provide a configuration file. The default settings are equivalent to this:
---
:backends: yaml
:yaml:
:datadir: /var/lib/hiera
:hierarchy: common
:logger: console
------------------------------------------------------------------
The lookup function uses Hiera to retrieve a value for a given key. By default, this returns the first value found (and fails compilation if no values are available), but you can configure it to merge multiple values into one, fail gracefully, and more.
When looking up a key, Hiera searches up to three tiers of data, in the following order:
1.Hiera.
2.The current environment’s data provider.
3.The indicated module’s data provider, if the key is of the form <MODULE NAME>::<SOMETHING>.
Note: Hiera always checks the global layer before the environment layer. If no global hiera.yaml file has been configured, Hiera defaults are used. If you don’t want it to use the defaults, you can create an empty hiera.yaml in /etc/puppetlabs/puppet/data/.
Arguments
You must provide the name of a key to look up, and can optionally provide other arguments. You can combine these arguments in the following ways:
•lookup( <NAME>, [<VALUE TYPE>], [<MERGE BEHAVIOR>], [<DEFAULT VALUE>] )
•lookup( [<NAME>], <OPTIONS HASH> )
•lookup( as above ) |$key| { # lambda returns a default value }
Arguments in [square brackets] are optional.
-----------------------------------------------------------------------
Hiera Backends
One powerful feature of Hiera is that the actual key-value data can be retrieved from different backends.
With the :backends global configuration we define which backends to use, then, for each used backend we can specify backend specific settings.
Build it backends:
yaml - Data is stored in yaml files (in the :datadir directory)
json - Data is stored in json files (in the :datadir directory)
puppet - Data is defined in Puppet (in the :datasouce class)
Extra backends:
Many additional backends are available, the most interesting ones are:
gpg - Data is stored in GPG encripted yaml files
http - Data is retrieved from a REST service
mysql - Data is retrieved from a Mysql database
redis - Data is retrieved from a Redis database
Custom backends
It's relatively easy to write custom backends for Hiera. Here are some development instructions
-------------------------------------------------
Hierarchies
With the :hierarchy global setting we can define a string or an array of data sources which are checked in order, from top to bottom.
When the same key is present on different data sources by default is chosen the top one. We can override this setting with the :merge_behavior global configuration. Check this page for details.
In hierarchies we can interpolate variables with the %{} notation (variables interpolation is possible also in other parts of hiera.yaml and in the same data sources).
This is an example Hierarchy:
---
:hierarchy:
- "nodes/%{::clientcert}"
- "roles/%{::role}"
- "%{::osfamily}"
- "%{::environment}"
- common
Note that the referenced variables should be expressed with their fully qualified name. They are generally facts or Puppet's top scope variables (in the above example, $::role is not a standard fact, but is generally useful to have it (or a similar variable that identifies the kind of server) in our hierarchy).
If we have more backends, for each backend is evaluated the full hierarchy.
--------------------------------------------------------------------------------
Using Hiera in Puppet
The data stored in Hiera can be retrieved by the PuppetMaster while compiling the catalog using the hiera() function.
In our manifests we can have something like this:
$my_dns_servers = hiera("dns_servers")
Which assigns to the variable $my_dns_servers (can have any name) the top value retrieved by Hiera for the key dns_servers
We may prefer, in some cases, to retrieve all the values retrieved in the hierarchy's data sources of a given key and not the first use, use hiera_array() for that.
$my_dns_servers = hiera_array("dns_servers")
If we expect an hash as value for a given key we can use the hiera() function to retrieve the top value found or hiera_hash to merge all the found values in a single hash:
$openssh_settings = hiera_hash("openssh_settings")
Extra parameters
All these hiera functions may receive additional parameters:
Second argument: default value if no one is found
Third argument: override with a custom data source added at the top of the configured hierarchy
$my_dns_servers = hiera("dns_servers","8.8.8.8","$country")
----------------------------------------------------------------
Puppet 3 data bindings
With Puppet 3 Hiera is shipped directly with Puppet and an automatic hiera lookup is done for each class' parameter using the key $class::$argument: this functionality is called data bindings or automatic parameter lookup.
For example in a class definition like:
class openssh (
template = undef,
) { . . . }
Puppet 3 automatically looks for the Hiera key openssh::template if no value is explitely set when declaring the class.
To emulate a similar behaviour on pre Puppet 3 we should write something like:
class openssh (
template = hiera("openssh::template"),
) { . . . }
If a default value is set for an argument that value is used only when user has not explicitly declared value for that argument and Hiera automatic lookup for that argument doesn't return any value.
----------------------------------------------------------------------
Using hiera from the command line
Hiera can be invoken via the command line to interrogate the given key's value:
hiera dns_servers
This will return the default value as no node's specific information is provided. More useful is to provide the whole facts' yaml of a node, so that the returned value can be based on the dynamic values of the hierarchy.
On the Pupppet Masters the facts of all the managed clients are collected in $vardir/yaml/facts so this is the best place to see how Hiera evaluates keys for different clients:
hiera dns_servers --yaml /var/lib/puppet/yaml/facts/<node>.yaml
We can also pass variables useful to test the hierarchy, directly from the command line:
hiera ntp_servers operatingsystem=Centos
hiera ntp_servers operatingsystem=Centos hostname=jenkins
To have a deeper insight of Hiera operations use the debug (-d) option:
hiera dns_servers -d
To make an hiera array lookup (equivalent to hiera_array()):
hiera dns_servers -a
To make an hiera hash lookup (equivalent to hiera_hash()):
hiera openssh::settings -h
=========================================================================================================================
*************************************************************************************************************************
=========================================================================================================================
PuppetDB
========
PuppetDB collects data generated by Puppet. It enables advanced Puppet features like the inventory service and exported resources, and can be the foundation for other applications
that use Puppet’s data.
What Data?
In version 1, PuppetDB stores:
•The most recent facts from every node
•The most recent catalog for every node
Together, these give you a huge inventory of metadata about every node in your infrastructure and a searchable database of every single resource being managed on any node.
Puppet itself can search a subset of this data using exported resources, which allow nodes to manage resources on other nodes. This is similar to the capabilities of the legacy
ActiveRecord storeconfigs interface, but much, much faster. The remaining data is available through PuppetDB’s query APIs (see navigation sidebar for details) and Puppet’s inventory service.
=========================================================================================================================
*************************************************************************************************************************
=========================================================================================================================
Puppet DashBoard - A Puppet Web frontend and External Node Classifier (ENC)
Puppet Dashboard is a web interface for Puppet. It can view and analyze Puppet reports, assign Puppet classes and parameters to nodes, and view inventory data
and backed-up file contents.
=========================================================================================================================
*************************************************************************************************************************
=========================================================================================================================
The Foreman - A well-known third party provisioning tool and Puppet ENC
Foreman is a complete lifecycle management tool for physical and virtual servers. We give system administrators the power to easily automate repetitive tasks,
quickly deploy applications, and proactively manage servers, on-premise or in the cloud.
=========================================================================================================================
*************************************************************************************************************************
=========================================================================================================================
Geppetto - A Puppet IDE based on Eclipse: an integrated toolset for developing Puppet modules and manifests
=========================================================================================================================
*************************************************************************************************************************
=========================================================================================================================
Masterless:puppet apply (generally as root)
Client/Server: Command used on the client: puppet agent -t (generally as root) and Command used on the server: puppet master (generally as puppet)
List all certificates: signed (+), revoked (-), to sign ( ): puppet cert list --all
Sign a client certificate: puppet cert sign <certname>
Remove a client certificate: puppet cert clean <certname>
To view all or a specific configuration setting: puppet config print all ; puppet config print modulepath
puppet.conf: It's Puppet main configuration file. /etc/puppet/puppet.conf for Enterprise /etc/puppetlabs/puppet/puppet.conf
Useful paths
======================
/var/log/puppet contains logs (but also on normal syslog files, with facility daemon), both for agents and master
/var/lib/puppet contains Puppet operational data (catalog, certs, backup of files...)
/var/lib/puppet/ssl contains SSL certificate
/var/lib/puppet/clientbucket contains backup copies of the files changed by Puppet
/etc/puppet/manifests/site.pp (On Master) The first manifest that the master parses when a client connects in order to produce the configuration to apply to it (Default on Puppet < 3.6 where are used config-file environments)
/etc/puppet/environments/production/manifests/site.pp (On Master) The first manifest that the master parses when using directory environments (recommended from Puppet 3.6 and default on Puppt >= 4)
/etc/puppet/modules and /usr/share/puppet/modules (On Master) The default directories where modules are searched
/etc/puppet/environments/production/modules (On Master) An extra place where modules are looked for when using directory environments
Other configuration files:
==============================
auth.conf :Defines ACLs to access Puppet's REST interface. Details.
fileserver.conf: Used to manage ACL on files served from sources different than modules Details.
puppetdb.conf: Settings for connection to PuppetDB, if used. Details.
tagmail.conf , autosign.conf , device.conf , routes.yaml.
These are other configuration files for specific functions. Details
/etc/puppet/environments/production/environment.conf
Contains environment specific settings
Testing Modules
===============
Puppet code testing can be done at different levels with different tools
puppet parser validate <manifest.pp> - Checks the syntax of a manifest
puppet-lint <manifest.pp> - A gem that checks the style of a manifest
puppet-rspec - A gem that runs rspec unit tests on a module (Based on compiled catalog)
cucumber-puppet - A gem that runs cucumber tests a module (Based on compiled catalog) OBSOLETE
puppet-rspec-system - A gem that creates Vagrant VM and check for the expected results of real Puppet runs.
Beaker - A gem that runs acceptance tests on multiple Vagrant VM
=========================================================================================================================
*************************************************************************************************************************
=========================================================================================================================
Puppet Configuration and basic usage - Overview
Operational modes: apply / agent.
Masterless - puppet apply , Our Puppet code (written in manifests) is applied directly on the target system.
No need of a complete client-server infrastructure.Have to distribute manifests and modules to the managed nodes.
Command used: puppet apply (generally as root)
Master / Client - puppet agent
We have clients, our managed nodes, where Puppet client is installed.And we have one or more Masters where Puppet server runs as a service
Client/Server communication is via https (port 8140).Clients certificates have to be accepted (signed) on the Master
Command used on the client: puppet agent (generally as root)
Command used on the server: puppet master (generally as puppet)
A Puppet server (running as 'puppet') listening on 8140 on the Puppet Master (the server ).A Puppet client (running as 'root') on each managed node.
Client can be run as a service (default), via cron (with random delays), manually or via MCollective.
Client and Server have to share SSL certificates. New client certificates must be signed by the Master CA
It's possible to enable automatic clients certificates signing on the Master (be aware of security concerns)
CERTIFICATES MANAGEMENT
On the Master we can use puppet cert to manage certificates
List the (client) certificates to sign:
puppet cert list
List all certificates: signed (+), revoked (-), to sign ( ):
puppet cert list --all
Sign a client certificate:
puppet cert sign <certname>
Remove a client certificate:
puppet cert clean <certname>
Client stores its certificates and the server's public one in $vardir/ssl** (/var/lib/puppet/ssl on Puppet OpenSource)
Server stores clients public certificates and in $vardir/ssl/ca (/var/lib/puppet/ssl/ca). DO NOT remove this directory.
Certificates management - First run
By default the first Puppet run on a client fails:
client # puppet agent -t
# "Exiting; no certificate found and waitforcert is disabled"
An optional `--waitforcert 60 parameter makes client wait 60 seconds before giving up.
The server has received the client's CSR which has to be manually signed:
server # puppet cert sign <certname>
Once signed on the Master, the client can connect and receive its catalog:
client # puppet agent -t
If we have issues with certificates (reinstalled client or other certs related problemes):
Be sure client and server times are synced
Clean up the client certificate. On the client remove it:
client # mv /var/lib/puppet/ssl /var/lib/puppet/ssl.old
On the Master clean the old client certificate:
server # puppet cert clean <certname>
=====================================
Puppet configuration: puppet.conf
It's Puppet main configuration file.
On opensource Puppet is generally in:/etc/puppet/puppet.conf
On Puppet Enterprise:/etc/puppetlabs/puppet/puppet.conf
When running as a normal user can be placed in the home directory:
/home/user/.puppet/puppet.conf
Configurations are divided in [stanzas] for different Puppet sub commands
Common for all commands: [main]
For puppet agent (client): [agent] (Was [puppetd] in Puppet pre 2.6)
For puppet apply (client): [user] (Was [puppet])
For puppet master (server): [master] (Was [puppetmasterd] and [puppetca])
Hash sign (#) can be used for comments
Main configuration options
To view all or a specific configuration setting:
puppet config print all
puppet config print modulepath
Important options under [main] section:
vardir: Path where Puppet stores dynamic data.
ssldir: Path where SSL certifications are stored.
Under [agent] section:
server: Host name of the PuppetMaster. (Default: puppet)
certname: Certificate name used by the client. (Default is its fqdn)
runinterval: Number of minutes between Puppet runs, when running as service. (Default: 30)
report: If to send Puppet runs' reports to the **report_server. (Default: true)
Under [master] section:
autosign: If new clients certificates are automatically signed. (Default: false)
reports: How to manage clients' reports (Default: store)
storeconfigs: If to enable store configs to support exported resources. (Default: false)
========================================================================
Useful paths
/var/log/puppet contains logs (but also on normal syslog files, with facility daemon), both for agents and master
/var/lib/puppet contains Puppet operational data (catalog, certs, backup of files...)
/var/lib/puppet/ssl contains SSL certificate
/var/lib/puppet/clientbucket contains backup copies of the files changed by Puppet
/etc/puppet/manifests/site.pp (On Master) The first manifest that the master parses when a client connects in order to produce the configuration to apply to it (Default on Puppet < 3.6 where are used config-file environments)
/etc/puppet/environments/production/manifests/site.pp (On Master) The first manifest that the master parses when using directory environments (recommended from Puppet 3.6 and default on Puppt >= 4)
/etc/puppet/modules and /usr/share/puppet/modules (On Master) The default directories where modules are searched
/etc/puppet/environments/production/modules (On Master) An extra place where modules are looked for when using directory environments
Other configuration files:
auth.conf :Defines ACLs to access Puppet's REST interface. Details.
fileserver.conf: Used to manage ACL on files served from sources different than modules Details.
puppetdb.conf: Settings for connection to PuppetDB, if used. Details.
tagmail.conf , autosign.conf , device.conf , routes.yaml.
These are other configuration files for specific functions. Details
/etc/puppet/environments/production/environment.conf
Contains environment specific settings
=============================================================================
Anatomy of a Puppet Run - Part 1: Catalog compilation
Execute Puppet on the client
Client shell # puppet agent -t,If pluginsync = true (default from Puppet 3.0) the client retrieves all extra plugins (facts, types and providers) present in modules on the server's $modulepath
Client output # Info: Retrieving plugin,The client runs facter and send its facts to the server. Client output # Info: Loading facts in /var/lib/puppet/lib/facter/... [...]
The server looks for the client's hostname (or certname, if different from the hostname) and looks into its nodes list
The server compiles the catalog for the client using also client's facts
Server's logs # Compiled catalog for in environment production in 8.22 seconds
If there are not syntax errors in the processed Puppet code, the server sends the catalog to the client, in PSON format.
Puppet Configuration and basic usage - Practice
Use the command puppet config print to explore Puppet's configuration options.
Give a look to the various Puppet related directories and their contents:
/etc/puppet, /var/lib/puppet, /var/log/puppet
============================================================================================================================================================
**********************************************************************************************************************************************************
=========================================================================================================================================================
Puppet architectures - Overview
The Components of a Puppet architecture,?Where to define classes,?Where to define parameters,?Where to place files.
Puppet security
The Components of a Puppet architecture
Definition of the classes to be included in each node,Definition of the parameters to use for each node and Definition of the configuration files provided to the nodes.
Components
==============
/etc/puppet/manifests/site.pp - The default manifests loaded by the Master.
ENC - The (optional) Enternal Node Classifier
ldap - (Optional) LDAP backend
Hiera - Data key-value backend
Public modules - Public shared modules
Site modules - Local custom modules
-------------------------------------------------
Where to define classes
The classes to include in each node can be defined on: /etc/puppet/manifests/site.pp - Top or Node scope variables
ENC - Under the classes key in the provided YAML
ldap - puppetClass attribute
Hiera - Via the hiera_include() function
Site modules - In roles and profiles or other grouping classes
--------------------------------------------------------------
Where to define parameters
The Parameters to include in each node can be defined on: /etc/puppet/manifests/site.pp - Under the node statement
ENC - Following the ENC logic
ldap - puppetVar attribute
Hiera - Via the hiera(), hiera_hash(), hiera_array() functions of Puppet 3 Data Bindings
Shared modules - OS related settings
Site modules - Custom and logical settings
Facts - Facts calculated on the client
------------------------------------------------------------
Where to define files
Shared modules - Default templates populated via module's params
Site modules - All custom static files and templates
Hiera - Via the hiera-file plugin
Fileserver custom mount points
------------------------------------------------------------------
Puppet Security considerations
Client / Server communications are encrypted with SSL x509 certificates. By default the CA on the PuppetMaster requires manual signing of certificate requests
# In puppet.conf under [master] section:
autosign = false
On the Puppet Master (as unprivileged user) runs a service that must be reached by every node (port 8140 TCP)
On the Client Puppet runs a root but does not expose a public service
Sensitive data might be present in the catalog and in reports
Sensitive data might be present in the puppet code (Propagated under a SCM)
========================================================================================================
Reporting
In reports Puppet stores information of what has changed on the system after a Puppet run
Reports are sent from the client to the Master, if report is enabled
# On client's puppet.conf [agent]
report = true
On the Master different report processors may be enabled
# On server's puppet.conf [master]
reports = log,tagmail,store,https
reporturl = http://localhost:3000/reports
Understanding Puppet runs output
Puppet is very informative about what it does on the functions
/Stage[main]/Example42::CommonSetup/File[/etc/motd]/content:
--- /etc/motd 2012-12-13 10:37:29.000000000 +0100
+++ /tmp/puppet-file20121213-19295-qe4wv2-0 2012-12-13 10:38:19.000000000 +0100
@@ -4,4 +4,4 @@
-Last Puppet Run: Thu Dec 13 10:36:58 CET 2012
+Last Puppet Run: Thu Dec 13 10:38:00 CET 2012
Info: /Stage[main]/Example42::CommonSetup/File[/etc/motd]: Filebucketed /etc/motd to main with sum 623bcd5f8785251e2cd00a88438d6d08
/Stage[main]/Example42::CommonSetup/File[/etc/motd]/content: content changed '{md5}623bcd5f8785251e2cd00a88438d6d08' to '{md5}91855575e2252c38ce01efedf1f48cd3'
The above lines refer to a change made by Puppet on /etc/motd
The File[/etc/motd] resource is defined in the class example42::commonsetup
A diff is shown of what has changed (the diff appears when running puppet agent -t in interactive mode)
The original file has been filebucketed (saved) with checksum 623bcd5f8785251e2cd00a88438d6d08
We can retrieve the original file in /var/lib/puppet/clientbucket/6/2/3/b/c/d/5/f/623bcd5f8785251e2cd00a88438d6d08/contents
We can search for all the old versions of /etc/motd with
grep -R '/etc/motd' /var/lib/puppet/clientbucket/*
=======================================================================================
Developing Types
Resource types can be defined in Puppet language or in Ruby as plugins.
Ruby types require one or more providers which manage low-lovel interaction with the underlining OS to provide the more abstact resource defined in Types.
An example of a type with many providers is package, which has more than 20 providers that manage packages on different OS.
A sample type structure (A type called vcsrepo, must have a path like /lib/puppet/type/vcsrepo.rb
require 'pathname'
Puppet::Type.newtype(:vcsrepo) do
desc "A local version control repository"
feature :gzip_compression,
"The provider supports explicit GZip compression levels"
[...] List of the features
ensurable do
newvalue :present do
provider.create
end
[...] List of the accepted values
newparam(:source) do
desc "The source URI for the repository"
end
[...] List of the accepted parameters
end
=======================================================================================
Developing Providers
The vcsrepo type seen before has 5 different providers for different source control tools.
Here is, as an example, the git provider for the vcsrepo type (Code (C) by PuppetLabs):
This file should be placed /lib/puppet/provider/vcsrepo/git.rb
require File.join(File.dirname(__FILE__), '..', 'vcsrepo')
Puppet::Type.type(:vcsrepo).provide(:git, :parent => Puppet::Provider::Vcsrepo) do
desc "Supports Git repositories"
commands :git => 'git'
defaultfor :git => :exists
has_features :bare_repositories, :reference_tracking
def create
if !@resource.value(:source)
init_repository(@resource.value(:path))
else
clone_repository(@resource.value(:source), @resource.value(:path))
if @resource.value(:revision)
if @resource.value(:ensure) == :bare
notice "Ignoring revision for bare repository"
else
checkout_branch_or_reset
end
end
if @resource.value(:ensure) != :bare
update_submodules
end
end
end
def destroy
FileUtils.rm_rf(@resource.value(:path))
end
[...]
end
=====================================================================================
Developing Functions
Functions are Ruby code that is executed during compilation on the Puppet Master.
They are used to interface with external tools, provide debugging or interpolate strings.
Importants parts of the Puppet language like include and template are implemented as functions.
module Puppet::Parser::Functions
newfunction(:get_magicvar, :type => :rvalue, :doc => <<-EOS
This returns the value of the input variable. For example if you input role
it returns the value of $role'.
EOS
) do |arguments|
raise(Puppet::ParseError, "get_magicvar(): Wrong number of arguments " +
"given (#{arguments.size} for 1)") if arguments.size < 1
my_var = arguments[0]
result = lookupvar("#{my_var}")
result = 'all' if ( result == :undefined || result == '' )
return result
end
end
This file is placed in puppi/lib/puppet/parser/functions/get_magicvar.rb.
==========================================================================================
Optimize code for performance
Reduce the number of resources per node
For each resource Puppet has to serialize, deserialize, apply, report...
Avoid use of resources for too many entities (Do manage hundreds of users with the User type)
Limit overhead of containing classes
(A module with the openssh::package, openssh::service, openssh::configuration subclasses pattern is uselessly filled with extra resources)
Do not use the file type to deliver too large files or binaries:
For each file Puppet has to make a checksum to verify if it has changed
With source => , the content of the file is retrieved with a new connection to the PuppetMaster
With content => template() , the content is placed inside the catalog.
Avoid too many elements in a source array for file retrieval:
source => [ "site/openssh/sshd.conf---$::hostname ,
"site/openssh/sshd.conf--$environemnt-$role ,
"site/openssh/sshd.conf-$role ,
"site/openssh/sshd.conf ],
This checks 3 files (and eventually gets 3 404 errors from server) before getting the default ones.
Reduce PuppetMaster(s) load
Run Puppet less frequently (default 30 mins)
Evaluate centrally managed, on-demand, Puppet Runs (ie: via MCollective)
Evaluate Master-less setups
Use a setup with Passenger to have multiple PuppetMasters childs on different CPUs
Disable Store Configs if not used
storeconfigs = false
Alternatively enable Thin Store Configs and Mysql backend
storeconfigs = true
thin_storeconfigs = true
dbadapter = mysql
dbname = puppet
dbserver = mysql.example42.com
dbuser = puppet
dbpassword = <%= scope.lookupvar('secret::puppet_db_password') %>
Evaluate PuppetDB as backend (faster)
storeconfigs = true
storeconfigs_backend = puppetdb
===============================================================================================